This article talks about recent developments in the ‘Moe family of instruments, which are tubular wind instruments with a unique pitch-control system. I’ve made ‘Moe clarinets, ‘Moe saxes, ‘Moe flutes and ‘Moe membrane reeds.
The current article is actually one of a pair of articles I’ll be posting around the same time. This one focuses on developments specifically relating to the ‘Moe family. The other article addresses topics more broadly applicable to homemade wind instruments of other sorts, including single-reed mouthpiece making, register holes, and the search for suitable non-toxic plastic tubing materials for homemade winds.
But before jumping into this recent work, I want to mention a very nice piece of ‘Moe-related news. I recently received an email from Dániel Váczi in Budapest. The email told of an instrument that he and his colleague Tóbiás Terebessy have been developing which involves a design concept extremely close to that of ’Moe. Dániel and Tóbiás arrived at their ideas independently, without awareness of my parallel work on the ‘Moe family. (Nor had I previously been aware of their work.) When I checked it out, I found that the Glissonic instruments, as they are called, are indeed almost identical in concept to my ‘Moes. Well, OK, there are a couple of differences. One, notably, is the fact that Dániel’s Glissonics are beautifully made, using primarily natural materials. (You can be sure that no one would say that about the ‘Moes I’ve made.) Dániel and Tóbiás have worked with several fine Hungarian wind instrument makers to produce some truly handsome instruments. You can learn more about the instruments here: http://www.glissonic.com/.
Dániel might never have learned of my closely related work on the ‘Moe, but for the fact that he was contemplating patenting the design. When his patent investigator did the requisite research he came across previously published information on ‘Moe, which in all likelihood meant that the Glissonic would not have been patentable. On hearing this, he let go of the idea of patenting, quite comfortable to continue the work without falling back on a patent number, and he then also took the time to send the email to me. Thanks, Dániel, for making contact and saying hello!
The role of patenting in this story hit me as a funny coincidence, because it happens that many years ago I wrote an article for the Experimental Musical Instruments journal on the question of patenting for musical instruments, and for the purposes of the article I used a precurser to ‘Moe as a sort of patenting test case. You can read a more recent description of this whole process here.
(Incidentally, as my own research had earlier found, and as Dániel’s subsequent investigations have also confirmed, several other continuous-pitch slit instruments have previously been patented, though none that we’ve found with the magnetic strips.)
OK, on to the remainder of this article, starting with a brief description of the ‘Moe idea. Many years ago I had the idea of making a clarinet-like instrument with an open slit running the length of the instrument in place of tone holes. The pitch would be varied by means of a flexible strip positioned above the slit and pressed down at different points to cover the slit to varying degrees. I tried a couple of different materials for the strip, and eventually settled on a magnetized plastic strip. If the body of the instrument along the sides of the slit is made of steel, then the magnetic strip seals nicely when pressed down over the slit, thus preventing leaks that would make the instrument speak poorly or not at all. You can see and hear some of my renderings of this idea here, here, here and here. (If you’re not already familiar with the instrument, do have a look at those pages so you can get a clear picture; otherwise the rest of this article may be hard to make sense of.)
The first ‘Moes, many years ago, were made of steel pipe. This provided the needed magnetism allowing the magnetic strip to seal dependably over the sides of the slit. It was beyond my capabilities to do a decent job of cutting the slit, so I turned to a machinist for that, and then had the pipe plated in nickel to prevent corrosion. The nickel plating, it turned out, did not last forever, and over time the playability of those instruments was compromised by corrosion. I later started making the bodies out of wood or plastic (for which it was a lot easier to do the required cutting in my home workshop), with just the sides of the slit formed of galvanized steel. Eventually I turned once again to a machinist — thank you, Daniel Yasmin! — to make for me several 1/8” x 3/4” galvanized steel bars with the 1/8” slit cut lengthwise over most of their length. So, with a plastic tube, for instance, I was able to slice off the upper portion of the tube longways, and glue one of these slitted steel bars in place of the sliced-away portion to create the slit with good seating for the magnetic strip. For wooden instruments, to make the fabrication manageable, I made elongated instrument bodies that were square in cross-section, making three sides of the tube from three pieces of wood, and adding the steel to make the fourth side. With wooden construction, it’s possible to make the equivalent of a conical bore in the form of a very long and narrow four-sided pyramid. Despite the fact that these bores are square in cross-section, they function very much like comparable instruments with circular cross section.
‘Moe is a continuous pitch instrument: it can play any note in the continuum from high to low, and gliss all you want between them. It’s also pretty good at playing discrete notes (that is, jumping from note to note without noticeably glissing between), but it’s not easy to consistently find the intended notes quickly with accurate intonation. This was one of the things that sent me back into the shop: I wanted a bit more surety and stability of pitch. Allow me to say: I’m confident that if someone were to practice ‘Moe for an amount of time comparable to what many people spend learning to play trombone or violin, that person could learn to play well in tune. But up to the present I haven’t spent that time, nor to my knowledge has anyone else, and I was looking for a quick fix. I gave the matter some thought and came up with a modification to the design of the instrument that I thought might provide more steadiness of pitch. The idea was: In place of ‘Moe’s steel bar with the long open slit running the length of the instrument, to substitute a steel bar with tone holes drilled in it. The magnetic strip would slap down over this steel bar just as it normally does over the slitted bar, and in so doing cover some number of tone holes just as it would otherwise cover some portion of the slit, but the holes would provide discrete pitches rather than a continuum.
In addition to making the ‘Moe pitches more dependable and discreet, this idea had another useful feature. To explain it, I’ll need to start with a bit of background. It’s relatively easy to make and play wind instruments with six or seven or eight tone holes. Beyond that, things get much more complicated very quickly. When there are more tone holes than you have fingers to cover them, you get into a need for keys and pads; along with that, the potential for tone-destroying leaks somewhere in the system rapidly increases. The playing, too, becomes more complex. Wind instruments that can play a full chromatic scale over a large range can certainly be made — we have all of the orchestral clarinets, flutes, oboes and saxophones as examples — but these instruments demonstrate my point: the keying systems on these instruments are immensely complex and require a high level of sophisticated machining. To fabricate them in a typical home workshop would be challenging, to say the least. So, what about those of us who are not professional machinists, yet who would like to make wind instruments capable of playing chromatically, with accurate pitch, over a large range? The ‘Moe with tone holes is a possible answer for this question. With this design, even I (with my lack of serious machine tools and chops) have been able to make well functioning, easily playable, seemingly leak-free chromatic instruments with as many as twenty tone holes.
The fact that I’ve been able to do more than eighteen holes is significant as it pertains to the possibility of an instrument capable of playing in both a lower and upper register, which greatly extends the potential range of the instrument. Cylindrical reed instruments like clarinets don’t overblow at the octave as flutes and saxophones do; for the clarinets the upper register appears a twelfth above the fundamental register. If you want to be able to play through the lower register and into an upper register chromatically, then to fill in all the notes of that lower register range of a twelfth without cross-fingerings you need at least eighteen tone holes. Then, to continue upward from there you can jump to the upper register and cycle again through the original holes. This new variety of ‘Moe, with its twenty tone holes, can provide this: it can play chromatically through the required range of a twelfth in the lower register, then extend the range further by using the same holes again as it continues up into the second register. (Of course, using the second register requires either a register hole or a very skilled player who can dependably produce the second register by embouchure alone. For more on register holes, see the companion article to this one.) Note that those non-clarinet-like instruments — the flutes, oboes and saxes that either have conical bore or openings at both ends — overblow the octave and so require just twelve tone holes before jumping to the second register. The tone holes ‘Moe system works for them as well, of course.
In making the ‘Moes with tone holes, getting the tone-hole placements right for accurate intonation has been a challenge. There are reasonably accurate ways to do this mathematically, and in doing this work perhaps I should have taken that approach, but, for whatever reason, I didn’t.* Instead, I worked out the tone-hole placements and sizing by informed guesswork and interpolation. As a result it took several increasingly refined prototypes to get things sounding reasonably well in tune. This prototyping approach was not quite as toilsome as it might seem, because I didn’t have to make the entire instrument only to discard it and start anew with each prototype; I was able instead to make a single instrument body and then make repeated tries at tone hole spacing on series of steel bars, temporarily glued in place on the instrument for testing. Another trick is to drill the holes a bit on the small side initially, which makes it possible (within limits) to then tune up to pitch by enlarging.
*[Here’s a short inserted note about the option of calculating tone-hole placements mathematically. If you’re not concerned with this, skip this small-print paragraph and continue with the main article below.
There is a widely used formula for calculating tone-hole sizing and placement originally developed by Benade and others. Under the right circumstances it can deliver very good results. It’s complex, but not so complex that you couldn’t, with some patience, run the numbers on a hand calculator. On the other hand, it is just the sort of thing that can be very practically managed via computerized spread sheets if you have the required math and programming chops. Indeed, there are several such calculators available online. The ones that I’ve been able to find, however, are limited to a relatively small number of tone holes. This is not surprising, since the typical expected use of such software is to make something like a six-hole pennywhistle, not a 20-hole ‘Moe. But beyond that, there’s another complicating factor in the predictive math approach: the actual sounding pitch in any wind instrument is not exclusively a function of the configuration of the tube and its holes; it’s also influenced by things going on at the mouthpiece. This is especially true for reed instruments, so if you’re making a reed instrument then you have to somehow account for these effects. There’s no very good way to do this short of making an actual playable mock-up, doing some measurements and checking pitch results, and factoring these empirical results into the calculation. It takes a bit of know-how, and it’s a chore. More information can be found in this book.]
Here’s one more consideration in doing the tone-hole placements for a ‘Moe with tone holes: it can easily occur that when the player presses down the magnetic strip, the point of pressing is such that the strip doesn’t lift up neatly above the hole leaving the hole fully open, but rather still half-covers it. This will lower resulting pitch. For the instrument’s lower notes, where the holes are widely spaced, this isn’t such a problem: the player can learn to press in the area between the holes. But for the very highest holes, closely spaced as they are, it’s just about unavoidable that there will be some partial coverage of the hole and the pitch will be a bit lower than if the hole were wide open. You can compensate for this by placing the uppermost holes a bit closer to the mouthpiece than you otherwise would, counteracting for the lowering effect. But more to the point is to recognize the fact that slight variations in finger position do affect pitch in this instrument, especially in the high notes; this is part of the character of the instrument and this can be seen as a feature, not a bug. Stated differently: It’s true that it’s much easier to play the tone-holes ‘Moe with stability and predictability of pitch than it is with the slitted version of the instrument. But that’s not to say it’s locked into a finite set of discrete pitches: even with the tone holes there still is more room for pitch bending and inflection on this instrument than there is with a standard clarinet.
In addition to the idea of tone holes, there’s another design alternative for instruments of the ‘Moe family that I’ve recently explored. It has to do with the way the magnetic strip is positioned to cover the slit. Most of the ‘Moes I’ve made are designed to be played with the slit and magnetic strip running along the top side of the tube. This makes sense ergonomically, as it places the fingers comfortably over the magnetic strip for dextrous playing. But as part of my recent rethinking of the possibilities of ‘Moe, I came up with an alternative configuration — not necessarily one to use exclusively in all ‘Moes from now on, but one which has some advantages and disadvantages to consider. In this configuration, the slit and magnetic strip are on the bottom side of the tube. The strip is not held under tension by a springy support arm as it is in the traditional ‘Moe design; instead, the unused portion — that is, lower part of the strip that’s not busy covering a portion of the slit at any given moment — is just allowed to flop down. There’s a reasonably facile and intuitive playing technique that goes with this: pitch is controlled by one hand sliding up and down along the tube with the thumb pressing the relevant part of the magnetic strip up to seal it against the its steel seating, while the portion of the strip beyond that goes under one finger and flops down, thus ensuring that the portion below is out of the way and separated from the steel seating.
One of the advantages of the Floppy ‘Moe arrangement is that, while the right hand slides up and down to control pitch, the most natural position for the left hand is nearer the mouthpiece in what happens to be a good position for covering and uncovering register holes, should the maker decide to include them. For more on that topic, see the companion article to this one.
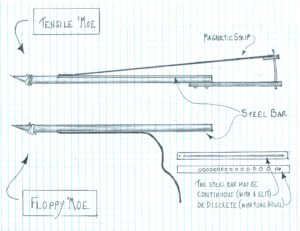
Terminology: I have been calling the original ‘Moe configuration Tensile ‘Moe. This is the arrangement with the magnetic strip held in position above the slit by the springy arm that holds it under slight tension at the far end. I’ve been calling the newer configuration Floppy ‘Moe. That’s the arrangement where the magnetic strip is positioned below with its free end flopping down. More terminology: instruments incorporating the idea of tone holes under the strip I’ve been calling Discrete ‘Moe (because they’re better at playing discrete pitches), and instruments having longways slit I’ve been calling Continuous ‘Moe (because they can play through the continuum of pitches). So, in the resulting typology you might find yourself, for instance, with a Discrete Floppy ‘Moe or a Continuous Tensile ‘Moe. Reading back over this paragraph on terminology I see that it comes across as mind-numbing word-salad; I will resist the temptation at this time to make the standard “there will be a quiz on this at the end” joke.
As it happens, the discrete tone holes idea works well with the floppy configuration, so the Discrete Floppy ‘Moe is a natural type. The reasoning is: it’s not a great idea to try to extend the range of the tone holes on a Discrete ‘Moe too far up the neck, because problems arise as the holes end up too close together. But you can still manage the minimum of 18 holes for the lower register, assuming that you can then jump to the upper register to continue the range upward. And, as noted above, the Floppy ‘Moe configuration places the fingers quite ergonomically for the addition of register holes, making this register leap quite feasible. Thus: Discrete-Floppy works nicely.
And to complement that, it happens that the continuous slit idea works well with the tensile configuration, making the Continuous Tensile ‘Moe another natural type. The reasoning in this case is: the tensile configuration does not lend itself well ergonomically to the use of register holes, but the continuous slit, if managed right, can allow for a huge range in the fundamental register alone — as much as three octaves, so no need to jump to the upper register. Thus: Continuous-Tensile likewise works nicely.
OK, that’s all for this article. Remember that you can find more information on the related topics of single-reed mouthpiece making, register holes, and nontoxic plastics for wind instrument making, in the companion article to this one.