This article is written to accompany the video called “Tubular Chimes, Altered”, which you can find posted online here. The video shows several modifications you can make to simple tubular chimes to create more varied and interesting chime sounds. The descriptions in the video are very brief, and this article is designed as a complement to the video: for those who may be interested in making any of these modified chimes, or in their underlying acoustics, there’s much more detail to be found here.
For most of this article, we’ll be looking in turn at each of the chime modifications shown in the video, providing the fuller description the video lacks. But before getting to that, we start with some background information.
When you strike a chime, you get a certain note, depending on length and diameter … or so it would seem, based on the ear’s initial response. But actually, of course, the situation is more complex than that. Like most vibrating bodies, a tubular chime engages simultaneously in multiple patterns of vibratory movement, and as a result it produces not one but multiple frequencies. Often one of these modes of vibration is stronger than the others and dominates enough that the listener gets a clear sense of pitch based on the frequency of that mode. Usually that’s the lowest mode, called the fundamental. Other modes may still sound, but they blend into the overall sound, imparting a bit of extra color to the tone quality. In other cases, the chime’s fundamental does not dominate so clearly. Various higher modes come through strongly, often at seemingly unrelated pitches, and it’s harder for the ear to recognize a single clear pitch in the sound. In a simple tubular chime the frequencies of the higher modes tend to be inharmonic relative to the fundamental, meaning that they don’t bear a certain simple mathematical relationship to the fundamental frequency. That being the case, their pitches don’t easily seem to blend in with the fundamental and reinforce its pitch-sense in the ear’s perception. This is usually seen as undesirable, with unwanted and distracting frequencies interfering with the intended tone. It needn’t necessarily be seen that way; you could equally well decide that you like a complex inharmonic tone quality. It is true, though, that prominent inharmonics often make the musical result feel more crowded and the pitch-sense less clear, especially in sonically dense contexts.
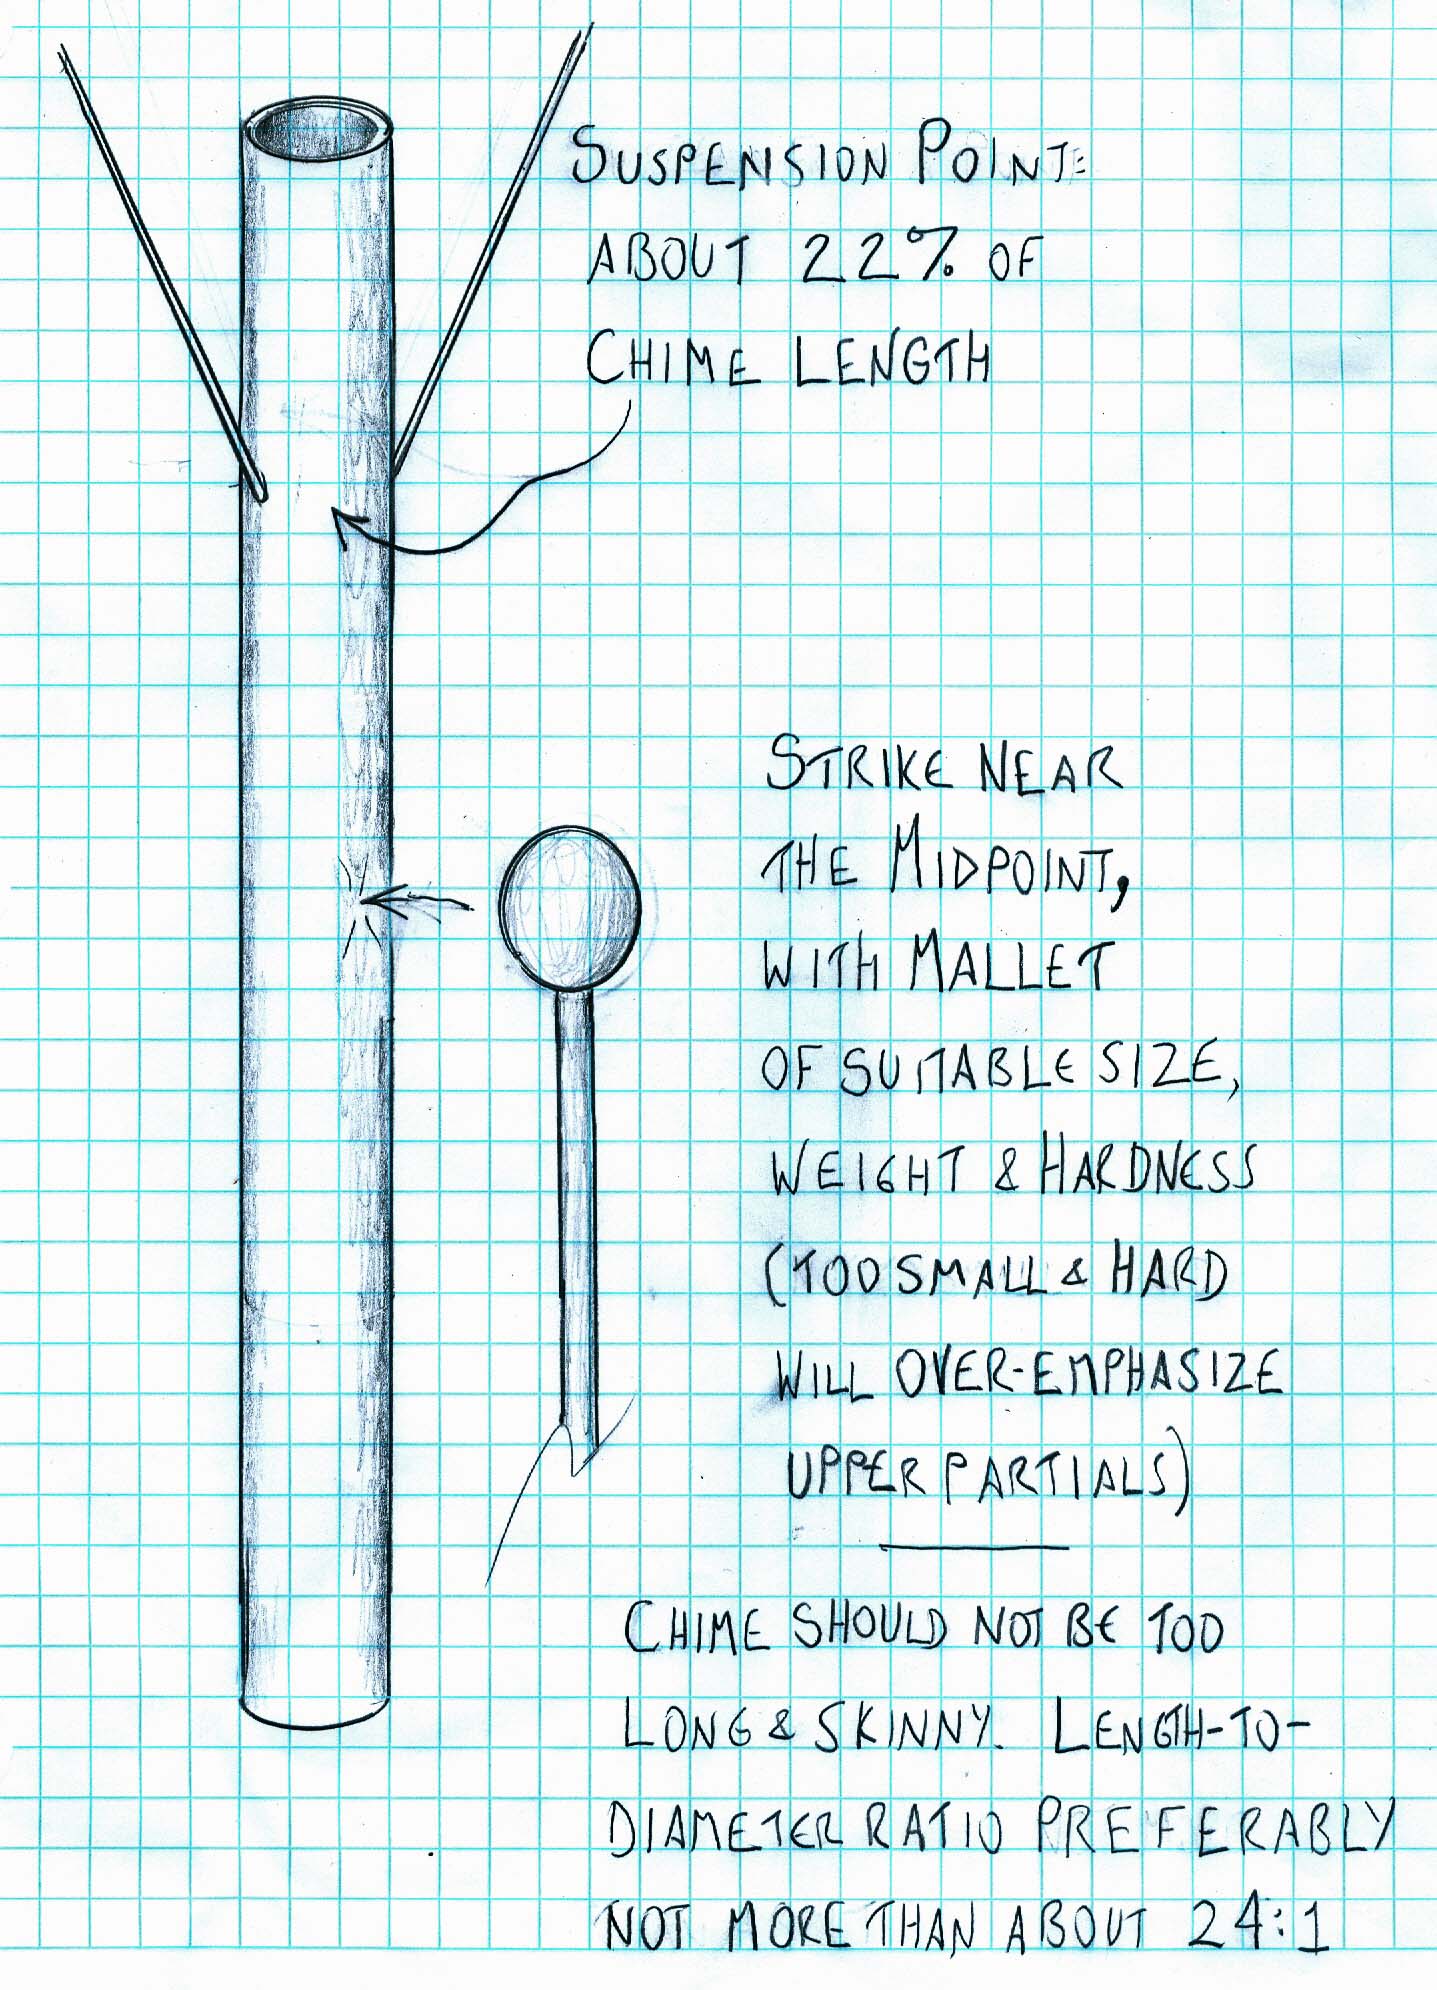
If you like the sound of a chime with a strong fundamental and a clear sense of pitch, there are some things you can do to bring out the fundamental and deemphasize the higher inharmonic modes. These include making sure the chime isn’t too long and skinny, striking near the center, choosing the right sort of beater, and suspending the chime in a way that allows the fundamental to sound freely while tending to damp out the higher modes (Figure 1). On the other hand, rather than emphasizing the fundamental and downplaying the tonal complexity, there are also ways to explore the complexity in search of interesting sounds … as we’ll see in several of the following modifications.
Figure 1: Basics for bringing out the fundamental in the sound of a simple tubular chime.
If you want to try your hand at making some of the chime types described here, but you’re not already experienced with chime making, then you may want a bit more basic information on the hands-on aspects of chime tuning. I’ve included some of that information in an appendix at the end of this article.
OK, let us now delve into the several modifications shown in the video.
BEATING CHIMES AND EVERLY CHIMES
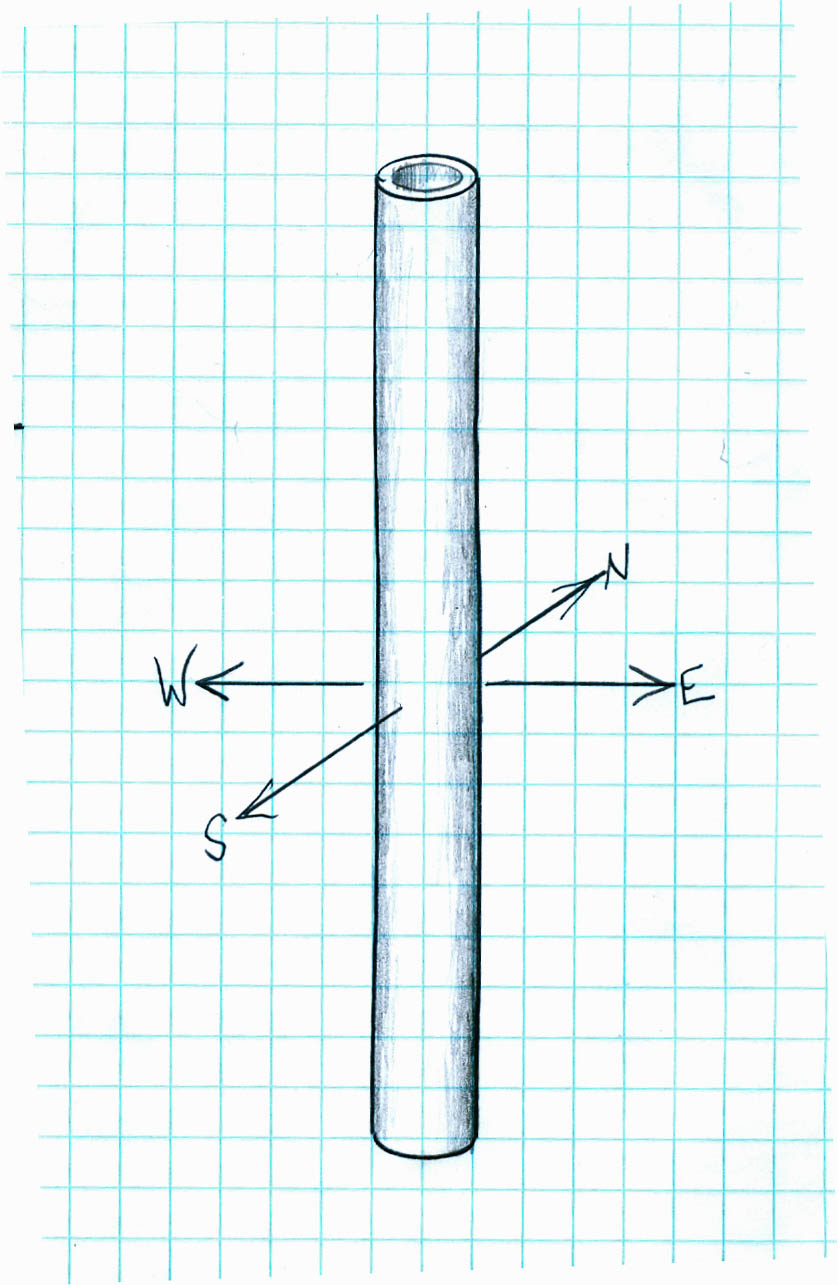
Beating Chimes and Everly Chimes are two chime types that produce dual-pitch effects — two frequencies from one chime. (We’re talking about dual fundamental pitches here. This is one of the cases where you’d probably opt to focus on the fundamental and deemphasize the overtones.) The dual pitches come about due to directional effects in the way the chimes vibrate. When you strike a chime, it vibrates in a certain direction or orientation, depending on what direction you hit it from (Figure 2).
Figure 2: Directionality
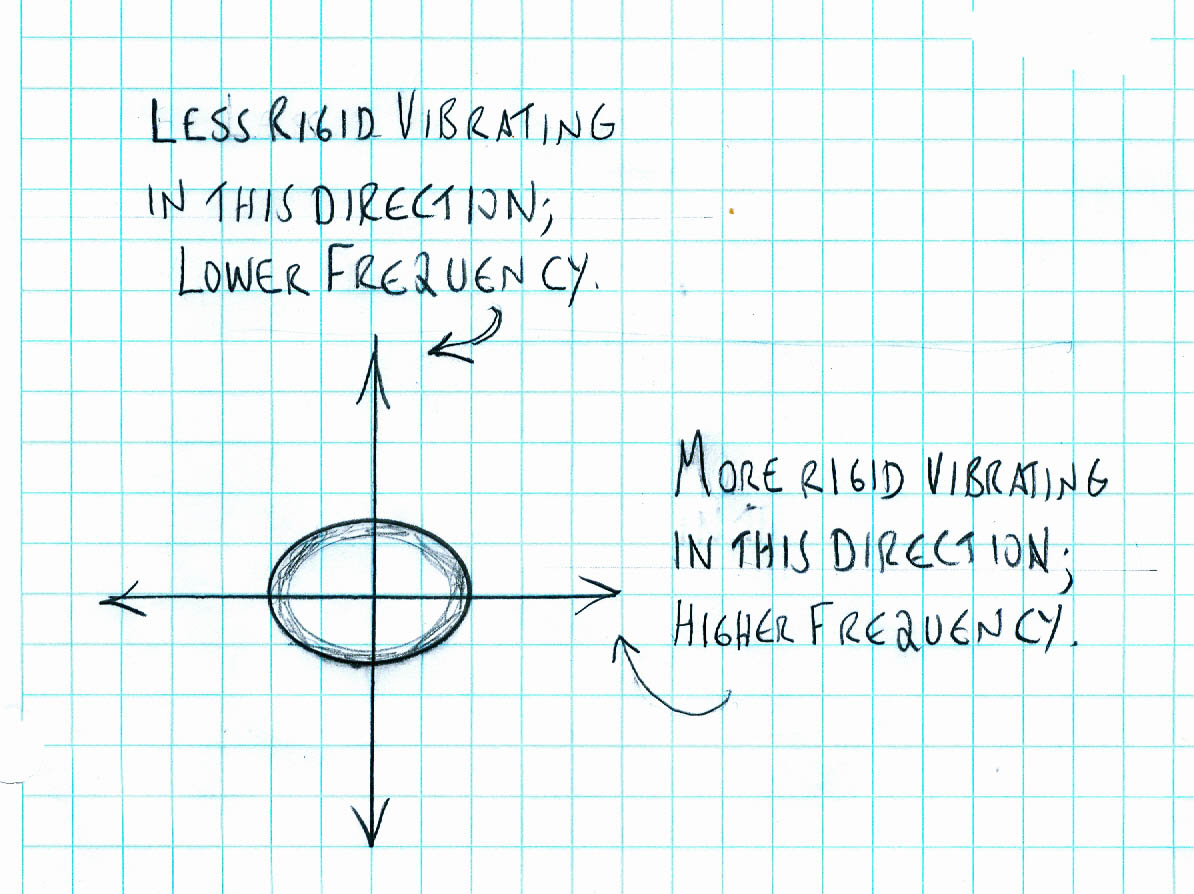
With a perfectly cylindrical chime manufactured to exacting tolerances, the direction of the vibration makes no difference: the chime is equally rigid for all directions of vibration, and it will produce the same frequency regardless of direction. But if it’s imperfect — if it’s slightly out of round, say, or if the tube walls are slightly thinner and weaker on one side, or if there’s a thickened seam running down the length of the chime on the inside — then the chime will be more rigid for one direction of vibration than another. In that case, it will produce a slightly higher frequency when vibrating in the more rigid direction (Figure 3). A given strike may excite it in the more rigid direction, or the less rigid direction, or, most often, a mixture of both. If both, then you’ll hear both resulting fundamental pitches.
Figure 3. Out-of-round tubes produce different frequencies dependig on direction of vibration.
What does that sound like? If the difference in rigidity is slight, as it might be in an imperfectly manufactured but otherwise unmodified section of tubing, then the two resulting tones are quite close together. When two close but not identical frequencies sound together, you get the effect known as “beating,” in which the two tones combine to create a single perceived frequency in-between, but with a tremolo effect — a repeating rise and fall in volume. The closer the two frequencies, the slower the tremolo.
Some tubes, as they come from the manufacturer, are nearly beat-free. Others are imperfectly made and show some beating. But whatever the tube’s initial condition, you can modify it to create the effect you want, from a perfectly steady tone to a rapidly beating tone. There are many ways to modify a tube to control the amount of difference in directional rigidity. One easy method is to drill a small hole through the chime at the midpoint and incrementally enlarge it until you get the beating effect you want. A still easier way is to put the tube in a vise and slightly squash it at its midpoint to create the out-of-round effect. You can squash very slightly for a slow tremolo or squash a little more to get the distinctive effect of a fast tremolo. That’s the method I used for the chimes shown in the video.
Getting into the weeds a bit now, here’s a peculiar acoustic consideration to be aware of if you make a tuned set of beating chimes. In lower-pitched chimes, the interval between the dual pitches required to get a certain number of beats per second is larger than it is for higher-pitched chimes. Imagine, for example, that you like the sound of, say, six wah-wahs per second. To get that beat-rate in a relatively low-pitched chime, the interval between the two notes will need to be fairly large, perhaps even large enough for the ear to recognize the two tones as separate, dissonant notes. For the same beat-rate in a high-pitched chime, the required interval will more likely be small enough that the ear will not recognize them as two separate pitches.
So far we’ve been describing what can be called Beating Chimes. But what happens if you keep on squashing, so that the directional difference in rigidity becomes ever more pronounced? In that case the two frequencies, initially very close, diverge more and more. At first the beating gets faster and faster until it no longer comes across as a tremolo; instead the tone takes on a kind of roughness. Soon it gets to where they are perceived as two separate pitches, but close enough that they come across as a musical dissonance. Eventually, with increasing squashing, the interval approaches a minor third, and the ear begins to hear the blend as harmonious. You can continue through increasingly large intervals this way, until at some point a little short of the octave the increasingly misshapen chime no longer vibrates as well and the tone quality deteriorates. These self-harmonizing chimes are the ones I’ve been calling Everly Chimes (Figure 4).
Figure 4. An Everly Chime, in the form of a tubular chime which has been center-squashed deeply enough to produce dual fundamental pitches at a large enough interval to be heard as a musical consonance.

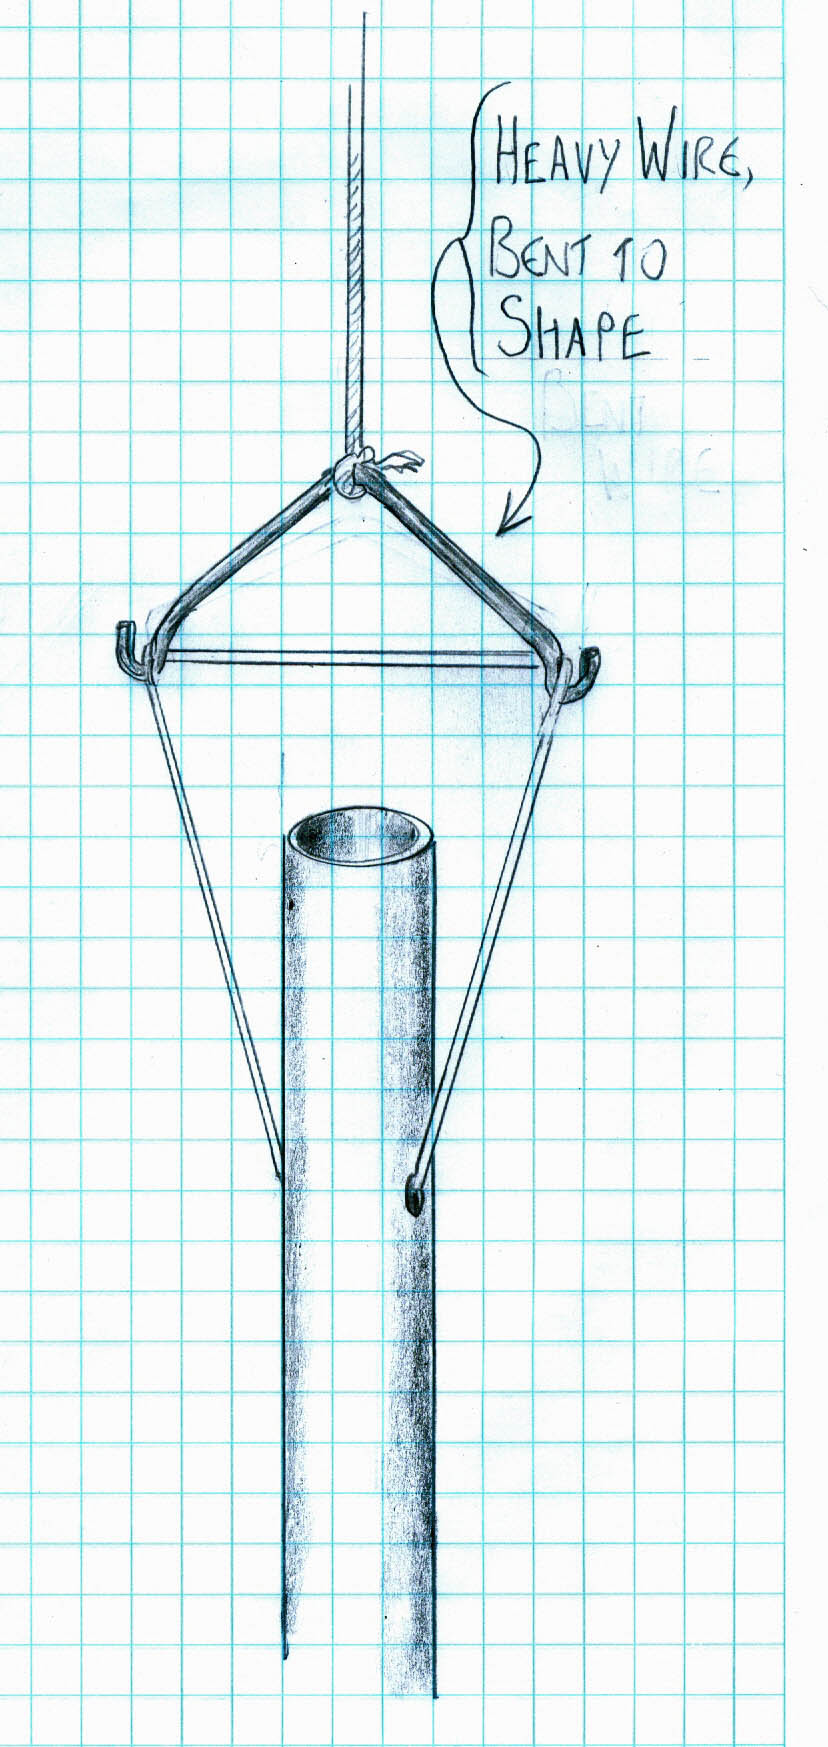
With both Beating Chimes and Everly Chimes, it makes a difference what direction you strike from: striking from this direction or that may bring out more of one or the other of the dual tones, or a balance of both. It helps to hang the chimes in such a way that the player easily strikes from the direction that brings out the preferred blend. On the other hand, these chimes are also directional in the way they project their sounds, and for this reason, it’s fun to mount them in a way that allows spinning (Figure 5). This further enriches the sound by creating vibrato and phasing effects. The trade-off is, spinning makes it difficult to consistently strike in a way that brings out a preferred blend.)
Figure 5. This mounting system allows for spinning the chime, while holding the suspension cord out at an angle from the chime so it doesn’t touch the top of the chime and damp the vibration.
With aluminum tubes, squashing in a vise is not overly difficult if you have a big, strong vise. With steel tubes or other hard metals, it’s still manageable if the vise is strong and tube walls aren’t too thick. With heavy walls it will be more challenging.
FORK CHIMES AND OTHER CHORDAL CHIMES
It’s also possible to make chimes that produce not just two primary tones, but many, creating the effect of a four- or five-note chord from a single chime. To do this, we can start by bringing out one or two of higher modes that we deliberately deemphasized in the Beating Chimes and the Everly Chimes. This can be done by some combination of using a relatively small, hard beater, striking off-center, and perhaps making the chime rather long relative to its diameter. To add still more tones, we can also physically modify the chimes in ways that makes additional new modes of vibration possible. One of the ways we did this in the video was by bifurcating one or both ends of the chimes, to create Fork Chimes (Figure 6).
Figure 6: A fork chime.

The fork chimes are capable of audibly producing all the usual chime modes (fundamental plus one or two of the lower overtones), plus additional tuning fork modes, plus another mode that involves the two halves of the forked end twisting and untwisting in opposite directions. Each of these modes produces its own frequency. You can vary which of the tones are emphasized within the chord by choosing where to strike the chime. With a set of two or more fork chimes you can create rainbows of interacting harmonies. The length and diameter of the chime, along with the depth of the slot that makes the fork, determine what those chordal tones will be. But you can’t deliberately tune all the notes to produce a particular chord … or, at least, it would be awfully difficult to tune in such a prescriptive way. The reason is that every little change you make to tune the frequency of one mode of vibration affects the frequencies of other modes. With everything affecting everything else, it’s very hard to pin down any prescribed tuning. A more satisfying approach to the tuning of the fork chimes is to set about cutting and modifying chimes in an open-ended exploration, gradually finding your way by luck and chance and lots of listening to fortuitously pleasing tonalities, whatever they may be.
In addition to forking, there are other ways to bring out multiple pitches. One, as we’ve seen, is center-squashing, which can be used in conjunction with forking for multiple-pitch effects. Another is to use a hacksaw to give the chime a crossways slit at the midpoint. This creates dual-pitch affects similar to squashing, but more complex as it affects other modes in each half of the resulting semi-divided tube. The most interesting effects come about with the slit cutting through between about a third or two thirds of the chime diameter. This too can be used in conjunction with forking.
By the way, like the Beating Chimes and Everly Chimes, Fork Chimes project their frequencies in a directional way, and they do nicely with spinning.
ARC (Air-Resonated Chime)
For the next tubular chimes modification, we’ll look at a method for enriching the fundamental tone by adding air resonance. In contrast to the situation with Fork Chimes, this modification is especially valuable in cases where you want to deemphasize the overtones and bring out the fundamental mode strongly for a nice, clear, warm tone with well defined pitch. Air resonance tuning is especially valuable in lower-pitched chimes, where the lower frequency of the fundamental might not otherwise project convincingly. To clarify how the air-resonance tuning works, we’ll draw a comparison to another instrument. Think of a marimba bar with its tuned tubular resonator tube hanging beneath. That resonator tube encloses a column of air which naturally has its own resonant frequencies. The resonator tube’s fundamental air resonance is deliberately tuned to match the fundamental frequency of the bar above. The vibrating bar pushes air in and out of the mouth of the resonator tube below to excite the tube’s air resonance, and the tuned air resonance enriches the overall sound, especially in the lower frequencies. Turning now back to chimes, we notice that a tubular chime has its own built-in air column — namely, the body of air contained within the chime. With typical chime dimensions, the resonance of this air column doesn’t come into play because its fundamental frequency happens to fall well below the chime’s frequency. Without agreement between those two pitches, the vibration of the chime doesn’t excite the air resonance. So we need a way to raise the air resonance and bring it into agreement with the chime tone. In effect, we need to shorten the air column to raise its resonance pitch, but we can’t do so by simply shortening the chime, because that would simultaneously raise the chime pitch.
There are a few different methods one could use to raise the air resonance without raising the chime tone. One would be to place a stopper in the tube at the location that leaves the required tube length on one side of the stopper. (If you do try this, you should angle-cut the tube-end on the resonating side. This creates a kind of air-scooping effect at that end which helps to drive the air resonance.) This method can create the desired air resonance, but at the cost of damping the chime tone quite a bit. Another method is to cut the chime to the shape of the Indonesian bamboo instrument called angklung. Look it up if you don’t know this instrument: it’s a very successful way of incorporating tuned air resonance into a chime-like vibrating body. The difficulty for us, though, is that to fabricate the same form in metal requires machine tools and skills beyond what’s available in most home workshops. (J.C. Deagan and the Deagan company did this with his Organ Chimes made of bronze in the early 20th century. It was a wonderful instrument, although Deagan’s claims to have originated it were less than honorable. You can look this one up too if you’re curious.)
For the air-resonance-tuned chimes shown in the video, I used another air-resonance tuning technique, one for which the fabrication processes are easy and don’t require special tools. (It is a bit challenging, however, when it comes to getting the tuning of the air resonance just right.) The technique is to drill suitably placed holes in the chime, analogous to the toneholes in a flute. Tonehole sizing and placement, in this case as in tubular wind instruments, is a big topic, and I won’t try to cover it here. But at the end of this article I have included a short appendix that may be helpful on the process as it relates to air-resonated chimes.
WEIGHTED CHIMES
As we’ve discussed, tubular chimes normally produce inharmonic overtones. Especially in chimes that are relatively long and thin, the frequency of the second mode of vibration often stands out distractingly in the chime tone, producing an unwanted inharmonic note, sometimes even louder than the fundamental. As we’ve seen, there are ways you can help this situation by making the fundamental stronger and the second mode quieter, but you could also ask: might there be ways to change the pitch of that overtone to some other note that blends in better with the fundamental? The ideal interval between fundamental and overtone would be one of the first few intervals of the harmonic series, especially octaves, twelfths, or their octave displacements. Those frequencies from the lower part of the series have the effect of reinforcing the perceived pitch rather than distracting from it. Overtone tuning to achieve this is often done in solid bars, such as marimba bars, and it can be done with solid rods as well. In those cases it’s done by reshaping the bar or rod, thinning in selected regions along the length. When done right, this can shift the overtone relationships to those more desirable intervals. But with tubes, this kind of reshaping isn’t so easy to do. You can’t thin the tube enough to do the job without going through the tube wall. For tubes, an alternative approach might involve squashing at selected points along the tube, similar to what we did with the Beating Chimes and Everly Chimes discussed above, thus reducing the tube’s rigidity at the selected point, at least for one direction of vibration. The trouble with this, as we saw with those other chime types, is that it gives rise to prominent dual pitch effects, unwanted in this case. Another approach is to make a saw cut part way through the tube, weakening the tube at some chosen location. But this too weakens the tube more for one direction of vibration than the other, and once again creates dual pitch effects.
Ah, but there is still another alternative for overtone tuning, and this one is more feasible with tubes. Instead of thinning or squashing to alter the overtone intervals, you can do the same by adding weight at chosen points along the tube. An easy way to do this is by drilling a hole through the tube and inserting a bolt of suitable size at a suitable location. The locations and weights of the bolts depend on what sort of change in the overtone recipe you’re after. Here are the basics for the tubular chime that appears in the video: In the unmodified tube, the inharmonic second mode tone typically appears at a slightly detuned 11th above fundamental/first mode. That inharmonic second mode would integrate more coherently into the tone if it could be positioned a twelfth above the fundamental, corresponding to the third harmonic. By adding a single weight at the midpoint of the tube, we can lower the frequency of the fundamental with almost no effect on the second mode. If we get the amount of weight right, we can increase the interval between them from an approximate 11th to a twelfth. This gives you a tubular chime in which that second mode overtone, instead of standing out distractingly at an inharmonic interval, now integrates more smoothly into the tone.
Start the process by drilling a quarter-inch hole at the midpoint of the chime. Put through this hole a quarter-inch bolt just a bit longer than the chime diameter and tighten it in place with a nut. Sound the chime and listen to for the interval between the fundamental and the first overtone. To hear this interval, first strike the chime at the center with a relatively soft beater — this will emphasize the fundamental. Then strike at about a fourth of the chime’s length with a relatively small, hard beater — this will highlight the overtone. You can thus compare the two pitches and listen for the interval between them. (Admittedly, this kind of listening isn’t easy for beginners and may take a bit of practice.) If the interval you now hear is still less than a twelfth, remove the bolt, add more weight in the form of a washer or two, replace the bolt and listen again for the interval. Repeat as necessary until the interval between the two modes is as twelfth.
There best suspension point for these chimes is at about 25% of the chime’s length. That differs from the preferred suspension point for unmodified chimes (normally 22.4%) because the presence of the weight shifts the node locations (Figure 7).

Figure 7: A tubular chime weighted so as to increase the interval between the fundamental pitch and the second mode pitch to a musical twelfth.
In playing this chime, you can strike at the center to emphasize the fundamental with the 2nd mode blending in in the background. Or, for a brighter tone quality, you can strike off-center to bring out the second mode a bit more.
Admittedly, the trick of inserting bolts through the chime isn’t the most refined approach to overtone-tuning. It’s not nearly as subtle, flexible and tweakable as the reshaping that’s done in marimba bars. Moreover, it may give rise to mild dual-pitch effects, and it may dampen the tone a bit. But for the simple operation of retuning the interval between the pitches of the first and second modes, it does the job.
EXOTIC OVERTONE-TUNED CHIME
A moment ago we discussed options for overtone-tuning that involve weakening the chime at selected points, and I said that this is problematic because both methods mentioned – squashing and making saw cuts – give rise to unwanted dual-pitch effects. When I explored these methods, I was unable to come up with a feasible overtone tuning that was in line with the sorts of overtone relationships one usually seeks. However, I did come up with a distinctly untypical tuning. The resulting tone quality is very unusual, but the pitch is clear, and the ear easily follows it in melody and harmony without pitch confusion. I did this overtone tuning by means of saw cuts made in such a way that the resulting dual fundamentals sound a fifth apart. Meanwhile, with a bit of fine-tuning by means of a couple more shallow saw cuts, the second mode of the lower of the dual pitches sounds two octaves above. That fifth in there is odd – it’s not part of the harmonic series, but it is an octave below one of the crucial harmonic series pitches. Thus, the fifth is not too far out of line in pointing back to the lower pitch as a fundamental. The second-mode pitch, at two octaves above, also reinforces this pitch-sense. In playing, you can either strike straight-on near the mid-point to favor the sound of the lower fundamental, or somewhere above or below the midpoint to highlight the second mode two octaves above. The latter method – highlighting the second mode – creates an unusual effect, with the prominent higher tone seemingly ghosted by the lower tones.
Here are the details (Figure 8):
Figure 8: Exotic Chimes, construction details.

Use a hacksaw or equivalent tool to make two cuts at the mid-point, positioned opposite each other and each extending about a third of the way through the tube. This leaves about a third of the tube’s width on at the middle between the two cuts. But don’t take that “about a third” literally. The art will be to cut through, equally on both sides, to where the dual fundamentals are a fifth apart, and no more. Start by cutting less than a quarter of the way through on each side, then check the dual fundamentals. Hopefully they’ll be less than a fifth apart, so go back and cut a tiny bit more and check again. Repeat until you’ve got the fifth; be careful not to overshoot.
When that is done, the overtone for the second mode will typically be a tiny bit sharp of two octaves above the lower of the dual fundamentals you just tuned. (To hear this tone more clearly, strike with a moderately small, hard beater at a point about a quarter of the tube length from one end.) To lower the second-mode tone, you’ll make saw cuts at one fourth of the tube length from each end. Once again it will be a pair of cuts on opposite sides of the tube (that’s four cuts in all; two opposite cuts at each one-fourth location). This time, because the amount of tuning required is slight, the cuts will be very shallow – typically, just saw kerfs not passing all the way through the tube wall, or perhaps just barely reaching through. The two cuts should be aligned with the deeper center cuts below. As before, cut in tiny increments and check the pitch frequently as you slightly lower the second mode pitch to where it is two octaves above the lower of the dual fundamentals. (Theoretically, these kerfs should result in dual tones for the second mode just as they did for the first mode below. But because the kerfs are shallow, and because you’ll be striking consistently from the front direction, this effect is not pronounced. To the extent that it’s audible, it can even be heard as something desirable, as the resulting beating adds an interesting shimmer to the second mode tone.)
Where to place the suspension hole? This is a matter of compromise, because the location that is ideal for the first mode is not ideal for the second mode. Placing it at about 18% of tube length gives good results.
MODE-TWO CHIMES
Here’s another, rather different approach to overtone management in tubular chimes. In the Mode-Two Chimes shown in the video, I’ve deliberately set things up so that the first mode, the fundamental, is deemphasized – in fact, it’s seriously deemphasized to the point where it can scarcely be heard. As a result, the second mode becomes most prominent, and the ear recognizes the pitch of the second mode as the defining pitch — a sort of pseudo-fundamental. (A nice term to introduce here: in carillon bells and some other instruments, the mode that is heard as the defining pitch — which often is not a true fundamental — is called the strike tone. The concept applies here. The mode two pitch, in these chimes, will be our strike tone.) This re-emphasizing is achieved by making the chimes relatively long and thin, striking in a certain off-center region with a relatively small, hard mallet, and placing the suspension point at a location that allows the second mode to sound freely while inhibiting the first mode. (These things are the opposite of what you’d normally do to emphasize the fundamental and minimize the higher modes.) Now, here’s a nice fortuity: It happens that in tubular chimes like this, pitch of the third mode of vibration is fairly close to an octave above the second. This means that those two modes can reinforce one another to produce what the ear hears as a coherent and well defined pitch, as long as the player is careful to strike in the right location and with the right sort of beater to bring out those two modes preferentially.
And so you can make a reasonably coherent-sounding set of Mode-Two Chime just by those tricks, without any special modification to the tube. But a moment ago I said modes two and three are “fairly close” to an octave apart. Does it bother you that the octave tuning between them is imperfect? You may choose to take matters a step further by refining this interval. In the Mode-Two Chimes shown in the video, I did this by drilling several holes around the periphery of the chimes at points chosen to affect one mode more than the other, thus changing the interval between them. The idea is to slightly weaken the chime at a location that lowers the pitch for mode 2 while having less effect on Mode 3. This is what’s needed to widen the interval to something closer to a true octave.
Here are details pertaining to Mode Two Chimes (Figure 9):
Figure 9: Mode-Two Chimes, construction details.

Chime length-to-diameter ratio should be in the general range of 24:1 to 36:1, give or take. (At this relatively long L:d ratio, the unwanted mode 1 tends to be rather weak, while the desired modes 2 and 3 modes stand out more.)
Suspension point should be around 15% of tube length from one end. (At that point, due to the locations of nodes and antinodes for the different modes, the suspension has only minor damping effect on the desired modes 2 and 3, and more damping effect on the undesired mode one.)
The striking point can be somewhere around a quarter of the tube length. (At that point, again due to the locations of nodes and antinodes for the different modes, it does a pretty good job of exciting modes two and three while minimally exciting mode one.)
To refine the imperfect octave tuning between modes 2 and 3 (if you choose to do so), drill two sets of holes at 32% of tube length from each end. This is close to an antinode (point of maximum flex) for mode 2; drilling makes the tube less rigid there and thus slightly lowers that mode’s pitch. At the same time, this point is closer to a node for mode 3, so it will have less effect on that mode. The net result is, the interval between the two modes is slightly increased, which is what’s needed for a more perfect octave. Drill six small-ish holes equally spaced around the circumference of the chime each 32% location, and then incrementally enlarge them to bring the tuning in line. Recognizing the two pitches that make up this interval may be difficult. You can make mode 2 more audible by damping at the center while striking at 32%. Make mode 3 more audible by damping at 32% and striking at the center. (Having six equally spaced holes minimizes unwanted dual-pitch effects. A labor-saver: drilling six holes can actually be a matter of drilling three through-holes, each passing through the near wall and the opposite wall of the tube.)
Remember to use a moderately hard mallet to help bring out those upper modes.
Worth noting: the orchestral instrument known as orchestral bells or tubular bells operate on principles closely related to those of the Mode-Two Chimes. Where the Mode-Two Chimes take advantage of a fortuitous near-harmonic relationship between modes 2 and 3, orchestral bells exploit a similarly fortuitous near-harmonic relationship between modes 4, 5 and 6. (See Thomas Rossing, Science of Percussion Instruments, 2000, p. 67-69 for a fuller discussion.)
DIPPING CHIMES
The final set of chimes shown in the video is the Dipping Chimes. If you dip the lower end of a vibrating chime in water, the pitch will drop as the water’s drag slows down the vibration. The deeper the dip, the more the drop in frequency. Some of the nicest sounds come about as smaller movements of the water around the chime create subtle bends and shimmery effects.
The water-dip chimes in the video are mounted on a wooden float, designed to hold each chime at a height that allows just an inch or so of the lower end to dip in. The chimes are held on springy armatures, so you can bend the pitch of an individual chime up or down by flexing so the chime goes deeper or less deep. You can also create a shimmer in all the chimes by nudging the whole float a bit deeper into the water and letting it bounce back. But in practice, these things may not seem necessary, as natural movement of the water alone is enough to create a shimmery and fluid sound.
If you make such a set, remember to tune the chimes in accordance with what their dipped pitches will be: if you expect the lower end of the chime at rest position to extend one inch into the water, tune it that way.
Even after the chimes are cut to length, you can use the water-dip level to provide tuning adjustments. This might involve adjustable suspension for fine-tuning the pitch, or multiple suspension points with different degrees of submersion, allowing the same chime to provide different pitches depending on how it’s suspended. For instance, you could make a set tuned to a major scale, but by providing a couple of suspension levels for each chime, make it so that you can easily change to a minor scale by switching the suspension points of a few chimes.
ALL DONE
And that completes the list of tubular chime modifications shown in the Tubular Chimes, Altered video. If you choose to make any of these chimes yourself, I hope the supplemental information in this essay will help with that. Tubular chimes of all sorts are among the easiest and most rewarding sound sources to work with and explore. Have fun; make music. Remember, you can see and hear the chimes described in this essay here.
~~~~~~~~~~~~~~~~~~~~~~~~~~~~~~~~~~~~~~~
APPENDIX 1: SOME BASICS FOR HANDS-ON CHIME MAKING
This appendix is far from a complete tutorial, but here are a few rudiments for first-time chime makers, very briefly stated.
Suitable materials for tubular chimes
Many metals can serve nicely. Aluminum is favored for its warm sound as well as its affordability, light weight, and easy workability. Many of the chimes appearing in the accompanying video are aluminum. The commonly available 6061 alloy works well. Also favored for a slightly brighter sound are coppers, brasses and bronzes, but tubing of these materials is more expensive and not always readily available. Steel tubing is less favored, but one variety of steel tubing has some big advantages: the galvanized steel tubing known as EMT is universally available in a wide range of diameters in suitable wall thicknesses, is extremely affordable, is rust-resistant, and produces a pleasant chime tone. Several of the chimes in the accompanying video are EMT.
Chime sizes
You’ve probably seen enough wind chimes around to have a sense of typical tubular chimes sizes. In fact, chimes can be made anywhere from quite small to huge. An important consideration is that the ratio of length to diameter. If the chime is too short and fat the tone will suffer and it will be less responsive. If too long and skinny, the fundamental will be too quiet and the upper modes will dominate the tone. Ideal length-to-diameter ratios vary depending on material and wall thickness, etc. but a typical acceptable range is between about 10:1 and 24:1. That applies if, as is usual, it’s the fundamental you wish to bring out; if you’re deliberately highlighting one or more of the higher modes, then a larger L:d ratio may be suitable. For chime sets which are to cover a large range, it may be helpful to graduate to a larger diameter for the longer, lower notes; this will help ensure consistent tone throughout the range. Choice of mallets, as discussed below, greatly affects the amount of overtone content and for this reason mallet choice plays into the question of L:d ratio.
Mounting
Chimes are often mounted by suspending them by loops of cord running through holes drilled through the chime. The holes are typically located at a nodal point (point of minimal motion) for the fundamental mode, thus allowing the fundamental to sound freely while other less desirable modes are to some degree damped. For an unmodified tubular chime this nodal point is at 22.4% of the chime length. (Modifying the chime in various ways may shift the nodal points; also, there may be times when you wish to emphasize other modes. Both these situations may suggest different locations for the suspension point.)
Tubular chimes can also be mounted horizontally, in the manner of xylophone bars. For horizontal mounting, they can be placed on pads or suspended on cords at the nodal points. Once again, this is typically 22.4% from each end, but it may need to be adjusted for chime tubes that have been modified in one way or another.
Those are the two most common mounting methods. Many others are possible, the key in each case being that the mounting system should leave the chime free to vibrate, especially in the fundamental mode (or, in unusual cases, whichever other mode you may wish to bring out).
Chime tuning
The longer a tube is the lower the pitch. The larger its diameter, the higher the pitch.
One approach to chime tuning is to tune purely by intuition with no outside reference, finding your way by luck and intuition to pitch relationships that you find appealing. You can even enjoy random tunings: cut your chimes to random lengths and find pleasure in whatever fortuitous pitch relationships result.
For those who wish to tune more deliberately to known pitches, here are some notes. If, as is most common, you’re tuning a chime’s the fundamental mode to a particular intended pitch, then you can use an electronic tuner, such as one of the several tuner apps available for cell phones. To help the tuner to give clear results, sound the chime using all the tricks described in the accompanying article to bring out the fundamental and de-emphasize the overtones. If you’re not using a tuning app, then you can tune by ear, matching the chime pitch to the intended pitch played on some dependable pitch source such as an electronic keyboard. Typically the tuning process involves cutting the chime a little long so that the initial pitch is below the intended pitch, then checking its pitch against either tuner or keyboard, shortening the chime a tiny bit to raise the pitch, checking again, and repeating until you’ve got it right. You can repeat the process for all the chimes in the set you’re making. Alternatively, if you like working with a calculator, try this option: Once you’ve got one chime tuned to a known pitch, you may apply the following scale factors to find lengths for the remaining chimes of your intended scale:
For tubular chimes of a given diameter (assuming the tubing is manufactured to close dimensional tolerances) you can raise the pitch by a semitone in the standard 12-equal scale by shortening the tube by a factor of .9715. You can find other upward intervals by repeatedly applying this factor. You’ll find that after twelve iterations you arrive at an octave-up factor of .7071. The semitone-down factor is 1.0293, and the octave-down factor is 1.4144.
For a couple of the chime modifications discussed in the article above and the accompanying video, there’s reason to tune the second mode. Electronic tuners and tuning apps have a hard time with this, but if you can really damp out the first mode and highlight the second, you may be able to get a reading from the tuner. The main tricks for bringing out the second mode pitch are: damp the chime at the center and strike at a point around 22% of the tube length with a fairly small, hard beater. If you’re not working with a tuner, doing these things will still make it easier for you to hear and tune the second mode by ear.
It’s very much worthwhile to choose well what sort of mallets to use with your chimes; different chimes sound best with different sorts of mallets. Harder and/or smaller mallets will tend to bring out higher overtones for a brighter sound and will work best on smaller, higher-pitched chimes; softer and larger will produce a warmer sound and will do better with larger, lower-pitched chimes. It’s useful to have a variety of mallet types on hand. You can purchase mallets of varying size and hardness from music stores online or off, or you can make your own. If you make your own, what to use as mallet heads? Superballs represent the soft extreme, while something like hardwood knobs would be on the hard side. Examples of in-between hardness are golf balls (sometimes just the thing for large chimes), and hardwood knobs coated in plastic dip or wrapped with a layer of Mole Skin or cloth tape.
APPENDIX 2: NOTES ON TONEHOLE PLACEMENT FOR AIR-RESONATED CHIMES
The subject of tone hole placement and sizing is much more than we can cover here, but this appendix contains a few notes pertaining specifically to tone holes in air-resonated chimes. Getting the air-resonance tuning right for these chimes is a bit of a chore when you’re new to the game. It takes a good ear and some very careful listening and, for newbies, the process may be slow and sometimes frustrating.
The idea is to drill tone holes in the chime positioned and sized so that they raise the air-resonance frequency of the air inside to where it matches the pitch of the chime itself. There are ways you can figure out the needed tonehole sizing and placement by calculation, but what follows here will be a description of doing it by hands-on iteration. We’ll describe the process in a moment, but first, here are a few things to know in advance (Figure 10):
Figure 10: Air-Resonated Chime, construction details.
To do the tuning, you’ll need to be able to check and re-check the air-resonance pitch. Too sound the air-resonance pitch, blow over the edge of one of the toneholes you’ve made which is adjacent to the tonehole-free segment of the tube that is to provide the tuned resonance. Blow as if playing an end-blown flute or a beer bottle and listen for the tone. The tone won’t be as clear as a flute tone, but it will have recognizable pitch.
Drilling a hole in the wall of the chime at some chosen location will have the effect of slightly weakening the chime for one direction of vibration, potentially creating an unwanted dual fundamental, as described in the section on beating chimes in this article. The effect may be small enough to ignore, but if you drill large holes or if you drill several holes, it will become pronounced. You can minimize this effect by drilling two smaller holes at each chosen location, positioned at points about 90 degrees apart around the tube.
The air resonance can be compromised if the presumably inactive portion of the tube length has no holes in it and is relatively long. To break up unwanted resonances that might develop in that section, it should have some additional holes in it. If you follow the tuning procedure described below, this may not be a problem: in the iterative process of approaching the correct air resonance tone, you’ll typically drill a series of holes which will serve to break up the inactive section. If you don’t do that, you may choose to drill some additional small holes within the inactive portion.
Holes which are positioned along the axis of the chime’s direction of vibration will do a better job of exciting air resonance than holes on the side, as air will be more effectively pushed in and out as the chime vibrates. A pair of holes 90 degrees apart (as suggested above) can work nicely if you strike from the direction midway between the holes (or, equally effective, from the opposite direction).
For long, thin chimes, the air column length required to match the chime pitch may be more than half of the chime length. For shorter and/or thicker chimes, the required air column length is more likely to be less than half. This question affects how you approach the tuning, as described below.
We can now describe the tuning process. If the chime is relatively long, thin, and low-pitched, the idea will be to drill a series of hole pairs (90 degrees apart) starting near one end and progressing toward the middle to create a shorter effective air column length extending from the opposite end. Start by drilling the first pair of small holes not too far from one end. How small depends on tube diameter. For example, for a 1” tube you might start with 3/16” holes. Check the air pitch by blowing over one of these holes and compare this air pitch to the chime pitch. Hopefully the air pitch will be too low. If only a tiny bit low, you can raise the pitch a small amount by enlarging the holes. If more than a tiny bit low, drill another pair of small holes a little farther along the tube where they will effectively shorten the air column a bit more. Check pitch again, and either enlarge as needed or drill another pair of holes. Continue until you’ve raised the air resonance pitch to where it matches the chime pitch.
For relatively short chimes, the air column length required to match the chime pitch will be less than half of the chime length. In this case you can drill a series of holes starting at the middle and progressing toward either end. You’ll have the option of tuning just one end or tuning both ends; doing both is recommended: After drilling the middle holes, progress toward one end by enlarging or drilling additional holes as described above, until the air-blown pitch at that end matches the chime pitch. Then go back and repeat the process symmetrically toward the other end.
When the air-resonance pitch matches the chime pitch, the tone will be noticeably fuller in the fundamental.