This article was written by Bart Hopkin with generous input from spring-master Eric Leonardson.
Not many musical instruments with coil springs as their sound source have become widespread and well known. Yet coil springs can make very interesting sounds, and a lot of experimental instrument makers and sound seekers have worked with them. In this article we’ll look at some of the sound possibilities that coil springs present.
FUNDAMENTALS
To start this discussion, let’s imagine a simple instrument for spring sounds, designed as follows: Picture a device consisting of a lightweight coil spring running through a cardboard tube of two or three feet long. Covering each end of the tube is a lightweight plastic diaphragm, and the ends of the spring are anchored to these. With this arrangement, when you excite the spring into vibration, the springy sounds are transmitted to the diaphragms which then act as soundboards to send the sound out into the air. You can excite the spring just by shaking the tube; this causes the spring to bang around against the tube walls. You can also sing into one of the diaphragms, which will pick up the vibration from the air and transmit it to the spring for a nice reverb. Old-timers among us may notice that this hypothetical instrument is similar to the commercial sound-maker called a Zube Tube, popular as a children’s toy in the late 1980s and 90s. We’ll have more on Zube Tubes later in this article. Meanwhile, we’ve just highlighted one of the important things to note: springs can serve either as primary vibrating bodies, as when the spring bangs against the tube wall, or they can serve to add reverberation to another primary sound source, in this instance, a voice. We’ll see many examples of both before this article is finished.
In thinking about what’s going on in this instrument, there’s a distinction that I want to highlight from the start, because it informs so much of what is to be discussed about coil springs as sounding objects. The spring in this instrument, like other coil springs, is capable of two main types of vibration, and for any given purpose it makes a difference which is in play. The two types are the transverse and the longitudinal.
Transverse vs. Longitudinal Vibration
Transverse modes are analogous to the modes in which musical strings vibrate – basically, they involve side-to-side movement.* If you have a long coil spring stretched between two rigid end points and you pluck it sideways like a string, it will vibrate transversely. Similarly, if you have a stiffer spring mounted upright at one end and you push the free end to one side and release, the resulting back-and-forth would likewise qualify as a transverse vibration.
*A more proper definition for transverse vibration is: in transverse modes of vibration, the direction of displacement is perpendicular to the direction of wave travel.
Longitudinal modes are analogous to the modes present in tubular wind instruments, like flutes. Unfortunately, since air movement isn’t observable, this isn’t as readily pictured. It involves patterns in which each little bit of air in the flute, or each coil in the spring, vibrates by moving back and forth in the longways direction, along the length of the air column or of the spring.* Imagine you have a long coil spring stretched between two end points. Imagine now that you pluck it by catching one of the coils with your fingernail, pulling it not to the side but toward one end of the spring, and releasing. The resulting movement will qualify as a longitudinal vibration. In a very long, loose spring, you’ll be able to recognize it visually as regions of either relatively compressed coils or more widely spaced coils running back and forth along the spring. Another example: If you have a stiff spring mounted at one end in an upright position, you can excite a longitudinal vibration by pressing the end down and releasing, so that it sproings up and down.
*A more proper definition for longitudinal vibration: in longitudinal modes of vibration, the direction of displacement is the same as the direction of wave travel.
Here’s how the transverse/longitudinal distinction plays out in the imaginary instrument just described. Recall that we had a diaphragm at each end of the tube which serves as a sort of mini-soundboard, helping to project the spring sound out into the air. The spring itself, we specified, is lightweight and made of a rather thin wire gauge, so it has very little surface area and as a result doesn’t transmit much sound into the air; furthermore, its sound is somewhat blocked by being enclosed in the tube. For those reasons, it is mostly via the two diaphragms that we’re able to hear the sound. The spring, as you can picture, is attached perpendicular to the diaphragms. Now consider how a transverse (side-to-side) vibration in the spring will transmit to the diaphragms: actually, it won’t transmit very well, because the flat diaphragm isn’t free to move in a side-to-side direction. So whatever transverse vibration might be going on in the spring won’t be strongly audible. Longitudinal vibration, on the other hand, transmits readily to the diaphragm, because with the spring’s perpendicular orientation relative to the diaphragm, the longitudinal movements are oriented in the perfect direction to push and pull the diaphragm. So our instrument would be very responsive to longitudinal vibrations in the spring and less responsive to transverse ones. (The commercially made Zube Tube has differently shaped end-pieces which make it more responsive to transverse; more on that later.)
In practice, both types of vibration are likely to be present anytime the spring is excited. It’s easy to picture how the side-banging of the spring would excite transverse modes, while banging the tube end-on will do more to excite the longitudinal. In either case, movement of one sort tends to translate into at least some movement of the other sort as well. In addition, it’s not as if there’s just one transverse mode and one longitudinal mode; there are actually many modes of each type. The sound is very much colored by the overall blend and the question of which ones happen to predominate. In short, springs are wonderfully complex vibrating systems, and it would be a fool’s errand to try to analyze all of the goings-on with precision. Yet it also remains true that by the direction of excitation as well as various tricks in how the sound is projected into the air, you can preferentially excite and/or radiate one type of vibratory movement more than the other. The two types do sound different, so this matters in the sound.
Here’s another practical application of the transverse/longitudinal question which will help to clarify the distinction. Imagine that you’ve made an instrument using a coil spring, and you want to amplify the sound using a pickup. Because most coil springs are made of steel, a magnetic pickup – the kind used in electric guitars – should do the job nicely. (We’ll talk more about different types of pickups later in this article.) But where should you position the pickup to get a good signal? The answer depends on whether it is transverse vibration you want to pick up or longitudinal. If it is the transverse that you’re after, you can place the pickup alongside the spring just as it would be placed beneath an electric guitar string. That way, as the spring vibrates from side to side it moves toward and way from the pickup, crossing the flux lines of the pickup’s magnetic field as it does so, and so inducing the signal in the pickup. At the same time, a longitudinal vibration in the spring, created perhaps by a longways plucking of the coils, would generate much less response in the pickup, because the longitudinal vibratory patterns don’t involve movement toward and away from a pickup that is placed to the side. For the pickup to respond well to the spring’s longitudinal vibration, you would need instead to position the pickup at one end of the spring, where the longitudinal movements of the coils will cross flux lines as they move toward and away from the pickup (we’ll say more later about how to configure this). Once again, both types of vibration will typically be present at least to some degree however you activate the spring, but the positioning of the pickup determines which the pickup will be most responsive to.
As part of this discussion of different types of spring sounds, we should make note here of one special case, that of door-stopper springs. Many makers have enjoyed attaching these short, stiff, tightly coiled springs (found at hardware stores everywhere) to boards of one sort or another so a player can get cool sounds by sproinging them sideways. What you hear in that case is mostly the rattling of the tightly wound coils against one another as the spring flaps back and forth. In this case the character of the sound derives as much from the mechanics of the form as from the acoustics of the material, and the sound is rather different.
Is the Fundamental Subsonic?
Here’s another aspect of spring vibration that’s important for understanding coil springs as sound sources. The vibratory modes of springs in some mounting configurations are closely analogous to those of other well understood musical vibrating bodies, such as strings (for transverse vibrations) and tubular wind instruments (for longitudinal vibrations). But because many springs are stretchy and soft, their speed of wave travel is slow. As a result, in all but very short springs the fundamental mode may have a frequency below the hearing range. But whether operating longitudinally or transversely, any given spring is likely to be capable of vibrating in many modes simultaneously, including that lowest mode (the fundamental) and many modes of higher frequency above that. In most cases what you hear when you excite a spring is not a fundamental tone, but some mix of higher overtones, often very much higher. The frequencies of those higher modes, in springs as in most vibrating bodies, are much more closely spaced than the relatively wide intervals of the lower parts of a typical overtone series. The audible effect, as far as the ear is concerned, is often a mash-up of closely overlapping frequencies with no recognizable pitch – more of a sizzle or a crash or a roar than a clear note. In some cases, especially in the longitudinal modes, you’ll hear the fundamental frequency not as a pitch in the audible range, but rather as a series of slap-backs as the waves of compressed coils reflect back and forth between the spring’s end points at a frequency low enough to be heard as a recurring pulse.
This lack of recognizable pitch in the audible range is why coil springs work well as reverb devices: while they may have well defined resonance frequencies way down there below the hearing range, up in the hearing range a reverb spring (if well chosen for the purpose) will display a mess of overlapping resonances which allow it to share in pretty much any frequency that is fed into it. The lack of recognizable pitch in the audible range is also why coil springs aren’t often used as the primary sound source in definite pitch instruments and are more often used for their unpitched sizzling or crashing or clanging or spacy sounds. We can also note that in those cases when coil springs do speak with recognizable pitch, it’s often not the fundamental that the ear is recognizing, but one of the higher overtone modes standing out enough to dominate the pitch-sense.
Whether the springs are serving as reverb devices or as primary sound sources, those very low frequencies – the ones low enough to be heard not as pitch but as a series of pulses – can color the rest of the sound in interesting ways. Audio people sometimes refer to such effects as LFOs – low-frequency oscillators. Recurring slap-backs, tremolos and vibratos are familiar examples; they alter what would otherwise have been a steady-state sound and give it a bit more interest. If your intention is to make a straightforward spring reverb device, then you probably wouldn’t want such effects, but if you’re just looking for interesting sounds, then it can be quite nice to have those sub-sonic happenings adding shape to whatever’s going on in the hearing range.
Here’s another cool thing about the subsonics: Switching our attention for a moment from sound to sight, we find that the subsonics are great for visual demonstrations of standing wave motion, especially for longitudinal modes. Consider a very soft coil spring of a few feet long loosely stretched between two fixed end points, plucked either transversely (with a sideways pull-and-release motion) or longitudinally (with a fingernail on one of the coils pulling and releasing longways). In this configuration both types of waves may travel slowly enough to be observed. The transverse pluck will bring out the same standing wave patterns that are present but harder to see in plucked strings. The longitudinal pluck will set up movements like the standing wave patterns of air in tubular wind instruments. These modes are not observable in the air, but in a spring vibrating longitudinally you can easily see them in the form of moving regions of relatively closely spaced or widely spaced coils as they reflect back and forth over the length of the spring. If you hang the spring from one end with the other end free, and if you then pluck longitudinally, the patterns will be analogous to those of the air in a tube stopped at one end. If the spring is fixed at both ends, you’ll see patterns corresponding to an air tube stopped at both ends. The both-ends-stopped form doesn’t correspond to any standard wind instruments, but it still makes fascinating viewing. These are great demonstrations for the physics classroom. Slinkies (the children’s toy) are excellent for this purpose, being observably large and soft enough for very slow wave motion.
Large or small
So far this discussion has focused on springs which are light enough to show characteristically springy motions on a normal human scale. We should also note that you can also get interesting sounds from very heavy springs such as might be used for suspension of heavy industrial or automotive equipment. For sound purposes, however, these are very different animals from the lighter, softer springs we have been talking about. Similar principals might theoretically apply in a continuum of spring sizes from small to large, but on a practical scale, such heavy springs don’t show the same acoustic effects as smaller springs. Yet they do often produce impressive metallic sounds showing varying degrees of sustain, often with unusual and luminous overtone blends, as illustrated in this video: https://www.youtube.com/watch?v=Wdq9DDmOCXg. Such very heavy industrial springs typically aren’t very long in terms of coil count: where a light gauge but moderately long spring may have scores of coils, a relatively small number of coils is usually enough to do whatever the heavy industrial spring is designed to do. It’s interesting to speculate about the acoustic possibilities of a massive industrial spring extending to large numbers of coils.
Definite Pitch?
To counterbalance my earlier comments about spring sounds without recognizable pitch, it’s important to note here that springs can be used for definite-pitch instruments too. This can be done by working with smaller or stiffer springs, in which the fundamental is up in the hearing range and the ear can readily hear that fundamental frequency. We’ll see instruments of this sort later in this article. Incidentally, there’s a practical aspect to this approach: the slow speed of wave propagation in many springs means that you can get low frequencies from relatively small springs. You can, for instance, make a spring bass that is much more compact than a typical string bass could ever be. (Something similar applies for strings made of stretchy materials like latex; see this article for more on that topic.)
Another way to make spring instruments of definite pitch is to use large or heavy springs with a complex metallic tone in which the frequency of one mode happens to dominate enough to create a recognizable pitch-sense.
Appended to the end of this article are some more arcane notes about coil spring vibrational modes and acoustics. I suspect that this more esoteric information won’t be interesting to many readers; that’s why I’ve banished this material to the end. But please do look at it if you’re interested in getting a bit deeper into the vibratory weeds.
METHODS OF EXCITATION (Activating the springs sounds)
Springs can be sounded by any of several means.
Plucking, as we’ve seen, can be done either by pulling to one side and releasing (to emphasize transverse vibration) or by pulling in the direction of the length of the spring and releasing (to emphasize longitudinal vibration). You can also strike the spring with a beater, which typically favors transverse vibration, or scrape along the length with some sort of scraper stick, which favors the longitudinal. The choice of beater makes a big difference in the resulting sound: broadly speaking, beaters that are harder and/or have smaller contact surfaces favor high frequencies; softer and/or broader beaters bring out lower frequencies.
Springs can also be played with a bow. Bowing can be especially rewarding due to its sustaining tone quality, and also for the ways that it can bring out selected overtones within the sound. For a fuller description of this I’ve excerpted some relevant paragraphs from Eric Leonardson’s article “The Springboard: The Joy of Piezo Disk Pickups for Amplified Coil Springs” in Leonardo Music Journal Vol 17. You’ll find that passage appended to the end of this article.
It’s also possible to excite springs electromagnetically using something operating on principals similar to those of the E-Bow. E-Bows are usually used with electric guitars; they provide ongoing string sustain by driving the string magnetically at the required frequency. However, the commercial E-Bow, being configured specifically for electric guitars, isn’t well suited for springs. To explore the idea of electromagnetically driven springs, it’s probably necessary to build a suitable device from scratch, as Bryan Day has done this in a couple of pieces (but which he hasn’t yet documented in detail).
GETTING THE SOUND OUT INTO THE AIR
Some coil springs are big enough to transmit their sounds reasonably well to the surrounding atmosphere when they vibrate, no further help needed for sound radiation. Many springs, however, don’t have much surface area, and don’t in themselves project their sounds well into the air. In this they are like strings, which typically need either something like a soundboard or a pickup to project their sounds. Even for springs that are reasonably audible in themselves, a soundboard or pickup may capture aspects of the spring’s vibration that don’t radiate well from the spring alone, especially in the lower frequencies. We’ll talk about soundboards first, then pickups.
Longitudinal modes work very nicely with soundboards: if you attach the spring perpendicular to the board, the vibrations can transmit and move the board effectively, given the direction of the longitudinal waves. Transverse modes call for a different configuration: by analogy to familiar string instruments, the board would typically need to be parallel to the spring(s) to respond to the sideways motion. But here we encounter a couple of problems, especially with lighter, softer springs. One is that springs that are easily stretched may not drive the board very effectively; they’ll tend to accommodate their own motions by stretching rather than forcing the board into motion. In such cases it might be helpful to go with a lighter, more easily driven board; Styrofoam in one form or another might prove useful. The other issue that comes up in applying soundboards to easily stretched springs is that the flexibility of the spring may mean that it vibrates with a very large amplitude, causing it to slap against a soundboard positioned alongside. Some ingenuity may be called for in designing the configuration; the soundboard of a guitar, closely parallel to the vibrating string, may not be a good model.
For an excellent example of a spring-and-soundboard system — one which even benefits from the air-resonance effects of an incorporated sound chamber — check out the Thunder Drums described below under “Commercially Sold Children’s Spring Instruments”.
The other option for getting the spring sound out into the air is pickups. These are of two main sorts: magnetic and piezo. We’ll start with magnetic.
Magnetic pickups, as mentioned earlier, can work well because the steel of the spring naturally works with the magnetism of the pickup. (Be aware, though, that some springs are made of stainless steel which is minimally magnetic and thus not effective in driving the pickup.) For transverse vibration the pickup can go alongside or under the spring somewhere along its length. There may once again be a problem with the wide amplitude of the transversely vibrating spring causing it to slap against the pickup; you can lessen this by positioning the pickup closer to one of the fixed ends of the spring. For longitudinal modes, the pickup should be placed at one end of the spring. Here the big question is how to anchor the spring at that end. You’d like the spring end to be anchored to something reasonably solid; this allows for good reflection of the traveling waves making for a strong and well sustaining vibration in the spring. But if this end-anchor is too solid, then there won’t be any movement at that point for the pickup to respond to. Some middle ground is called for. One effective solution — offered here not so much to recommend this particular approach as to illustrate the forces in play — is to attach the end of the spring to an upright steel post. The thinner and/or the taller the post, the more flexible it will be, allowing the spring to drive it and in turn to drive the pickup. You can experiment with different heights and thicknesses to get the best result. It helps greatly that the steel post also functions magnetically as it moves. Place the pickup as close to the post as possible short of touching.
The other pickup option is piezos. Piezo pickups can be attached directly to a vibrating body to pick up the sound. They may be attached to the body of the instrument somewhere, or to the bridge or end-anchor that the spring is attached to. I’ve found that the good old Styrofoam can work remarkably well as the thing the piezo is mounted on, even if it is just a Styrofoam cup which is placed in contact with the spring somehow. Piezos often produce a sort of scratchy or tinny sound which may be particularly pronounced with springs. In such cases a bit of EQ may be helpful — basically, you can turn down the treble range, or try a dip in the range around 2-3KHz.
SOME COMMERCIALLY SOLD CHILDREN’S TOYS WITH COIL SPRINGS
At the start of this article I said that there are not many well known musical instruments or sound devices using coil springs. None-the-less, a few types of spring-sound gadgets have found their way into the commercial world. One type, as mentioned, is spring reverb devices, which are discussed below. Another type is spring-based children’s sound toys, of which several have been produced.
Zube Tube. (This photo borrowed from the excellent web site of Richard’s Variety Store, which once carried Zube Tubes but now lists them as out-of-stock. Thank you, Richard’s.)
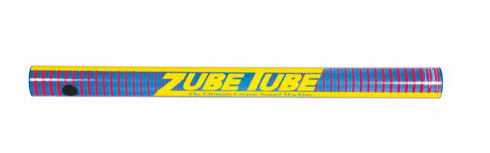
The afore-mentioned Zube Tube, pictured below, is one. These appeared sometime before 1989 and were fairly popular in 90s. (The ‘89 date comes from this newspaper article celebrating their wonderfulness; thanks to Eric Leonardson for tracking that down.) It appears that Zube Tubes are no longer being made, but you can still find them on eBay. A Zube Tube consists of a lightweight coil spring running through a cardboard tube either about 20” long or about 36” long, anchored at each end to a shallow, lightweight plastic flat-bottomed cup fitted into each end so that the bottom of the cup extends into the tube. You can excite the spring just by shaking the tube so the spring bangs against the interior tube walls making wonderful reverberant sci-fi spacey sounds. You can also sing into one of the cups for nice reverb effects. The cups act as sound radiators for the spring, and their shape allows them to be more responsive to transverse vibration than a flat diaphragm would be. The cup’s partial enclosure also provides a bit of air resonance, helping in what would otherwise be a weaker low-frequency response. The hollow cup shape also provides better voice-capture and resulting reverb for someone singing into the cup. Some Zube Tube models included a small air vent hole which, when covered and uncovered, created a nice waffling of the air resonance tone from within the tube.
Echo Mic
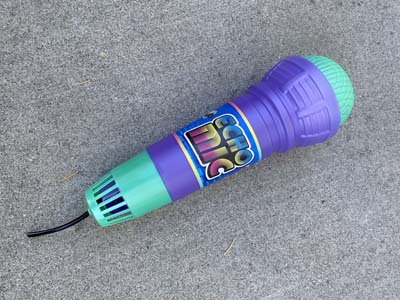
Another spring reverb toy is the Echo Mic. Echo Mics are still widely available, and at very low cost. The Echo Mic is a 10” long plastic thing made to look like a (rather large) microphone. (From the label: “Groovy Echo Mic / Bring Out Your Inner Pop Star!”) Singing into it activates an internal reverb spring attached to a lightweight plastic diaphragm. The mechanism is much like that of a Zube Tube, except that the Echo Mic is so poorly made that it really doesn’t work very well. There are a couple of design problems, one of which is that the spring is too small – less than 2” long unstretched, when the available space would have allowed it to be at least twice that. Also, the diaphragm is small and its shape isn’t ideal.
Thunder Drum and Thunder Tube
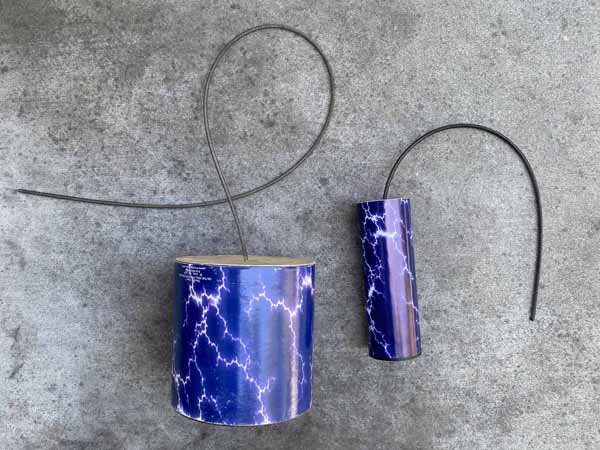
Thunder Drums and Thunder Tubes represent another wonderful spring-based sound toy. These are made by the Remo drum company, while copycat versions are sold under similar names from other makers. A Thunder Tube is a short tube with a lightweight, high-tension drumhead covering one end. A long, narrow, moderately stiff coil spring is attached to the center of the drumhead. The drum normally is held with the head downward and the spring dangling below. Anything that agitates the spring produces an impressive thunder-like sound. Thunder drums are available in a couple of forms and sizes, one with a relatively long, narrow tubular drum shape (2” x 7”) and one shorter and wider (6” x 6”). In normal playing position the spring hangs down from the drumhead, making for efficient transmission of vibration from spring to drumhead. The drumhead acts as a soundboard, providing a vibrating surface for sending the sound out into the air. In addition, the air resonance of the air inside the drum enriches the sound, especially in the lower frequencies, much as it does, for instance, in the sound chamber of a guitar or violin.
One more spring-based children’s toy from the good old days, the Slinky, is still available online. Slinkies may be useful in situations calling for large diameter, very floppy springs. I’ve found them to be good for visual demonstrations of wave motion in springs; not as good for interesting sounds, but hey, maybe with a bit of experimentation you’ll stumble upon some wonderful slinky sound.
SPRING REVERBS
In the days of analog electronics, spring reverb units were everywhere, adding their characteristic echo to vocals and guitar solos and everything else in the rock and soul and pop music of that time, both live and recorded. Older readers may recall the sound you’d hear if you moved a Fender guitar amplifier a little too roughly when it was turned on and the reverb knob happened to be turned up high. There were reverb springs inside the amplifier housing, and with any jerky motion they would flop around and slap against the sides of the housing, sending generous doses of unintended spring-crashing sound to the amp and speaker. One of the main reasons spring reverbs were so popular was, they were a lot more compact than the other leading options — plate reverbs and room-sized echo chambers. Today, people feel a nostalgic fondness for the spring reverb sound; you can even get digital simulations of it.
The central element in a typical spring reverb is a “tank” (trough-shaped metal housing) containing anywhere from three to six light, soft coil springs, typically between about 8” and 18” long, lightly stretched between two end points. The dry signal — that is, the sound that is to have reverberation added — is sent to a driver at one end of the springs. At the other end, a pickup picks up the springified version of the sound and sends it back to where it can be mixed in with the original signal. You can get more details from any of the many DIY reverb tutorials online – just google something like “how to make a spring reverb”.
By the way, some of those online tutorials suggest using the spring from an Echo Mic (described earlier in this article). I don’t recommend this; the Echo Mic’s spring is too small. You’ll do better with a longer spring.
And hey, also very much worth trying: You can add an acoustic spring reverb to many existing instruments, or to an instrument you design for just this purpose. For instance, you can hook a long-ish, very lightweight coil spring directly over a guitar string, find some way to anchor the opposite end under minimal tension, and play. This works with acoustic or electric. The sound is enchanting. In principle this is very simple to do, but in practice it may be a bit awkward: what do you attach the far end of the spring to and how does that allow for ergonomic playing? You can attach springs to many other instrument types as well, such as lamellaphones and drums. More information on this idea appears later in this article in the descriptions of the instruments called Only Ten and Silver and Black.
TYPES OF COIL SPRINGS; WORKING WITH THEM; WHERE TO GET THEM
The two main types of coil springs are extension springs and compression springs. Extension springs are ones in which the coils in rest position are touching with no space between; they’re good for applications where the spring is to be stretched. Compression springs are those in which the coils in rest position are spaced apart; they’re good for either compression or stretch. The main specifications for springs are the length, the diameter of the wire used to make the spring, and the outer diameter of the coil. The thinner the wire gauge, the softer the spring. For a given wire gauge, larger coil diameter likewise has the effect of making the spring softer. Most springs are made from spring-tempered steel wire, also known as music wire. Less common are springs made from a spring-tempered stainless steel for corrosion resistance. Springs typically come in fairly short lengths, but longer lengths, typically up to 36” (and stretchable to much longer still), can often be found or can be purchased as spring stock.
For sound applications, many different spring sizes and gauges can be useful. For reverb sounds, the most effective springs are usually those with the smallest available wire gauges — typically in between .018” and .025” for coil diameters in the range of ¼” to 3/8”. For heavier spring sounds, well, there’s no substitute for hands-on exploration to figure out what sorts and sizes are bests for the sounds you’re after.
The selection of springs available at the local hardware store may be limited; you may not be able to find spring stock in your needed lengths. There are some online outlets that specialize in springs, such as thespringstore.com and mwcomponents.com. You can also find a good selection at McMaster Carr, presented with detailed product information. Online searches for springs are likely to turn up lots of outlets specialized for the automotive industry, which tend to be on the very heavy side.
But most fun: You can often find sonically useful springs as parts of various throwaways such as old turntables, door and gate closers, children’s toys and who knows what else. Your local scrapyard may have a nice collection.
Because it is made of extremely hard wire, spring stock is difficult to cut with wire cutters. The specialized sheers sold as music wire sheers or hard wire cutters are recommended for smallish gauges. For cutting large gauges … well, that can be a challenge. It may be possible to take advantage of the material’s extreme hardness/brittleness by filing a groove at the intended break point and then breaking in a vise with a hammer. Be wary of newly cut edges; they can be wickedly sharp. Carefully ease them with a file or bend them back on themselves. It’s often necessary to bend the wire at the end of a spring to make some sort of attachment point. Springs of thin wire gauges can be bent with pliers. Heavier gauges will be more of a struggle and in extreme cases almost impossible to bend or cut without industrial tools.
SOME SPRING INSTRUMENTS AND MAKERS
Many individual makers have explored this territory in search of distinctive sounds. Here are the names of just a few makers who’ve done good work with coil springs. I encourage you to look them up. A good internet search will turn up many more.
Eric Leonardson: https://ericleonardson.org
In addition to Eric’s website, see also:
https://www.flickr.com/photos/eleonardson/albums/72157622512963893
https://microphonesandloudspeakers.com/2017/08/28/springboard-eric-leonardson/
“The Springboard: The Joy of Piezo Disk Pickups for Amplified Coil Springs” by Eric Leonardson in Leonardo Music Journal Vol 17 2007): https://www.researchgate.net/publication/240678051_The_Springboard_The_Joy_of_Piezo_Disk_Pickups_for_Amplified_Coil_Springs
Görkem Şen: https://www.youtube.com/watch?v=_aY6TxC1ojA
David Hilowitz: https://www.youtube.com/watch?v=eD9x-gUxaac
Richard Winer: https://www.pinterest.com/pin/174936766752938991/
Franz Schmuck: https://www.youtube.com/watch?v=Wdq9DDmOCXg
Bryan Day: https://www.youtube.com/watch?v=Fge-AdmOogA. (That youtube video shows one of Bryan’s several spring instruments. His website at http://www.bryanday.net is worth exploring but doesn’t feature the spring instruments prominently.)
Sudhu Tewari: http://www.sudhutewari.com/Installations/GreenApples/GreenApples.html. This video feature’s one of Sudhu’s spring instruments prominently; for more of his work visit http://www.sudhutewari.com.
Indie Film & Music, maker of “The Apprehension Engine” (personal name not given): https://youtu.be/lzk-l8Gm0MY?t=177 (hand-played spring reverb appears around 3:00).
Morfbeats: https://tapeop.com/interviews/btg/76/diy-reverb/
Nicolas Collins, “Build Your Own Reverb,” in Tape Op no.76: https://www.nicolascollins.com/texts/TapeOpReverb.pdf
The Hugh Davies Project, featuring works by Anton Mobin and others: https://hughdaviesproject.wordpress.com/instrument-building/ (scroll down for several spring instruments)
As for myself, I had not made any coil spring instruments until recently. But I try to make it my business to learn about whatever interesting sound-making ideas may be abroad in the land, preferably first-hand, so a few months ago I set about to do some exploring. I made several spring instruments. In some of these instruments, springs are the primary vibrating bodies. In others the sounds from other initial vibrators are colored by the addition of springs for reverberation. Here are brief descriptions.
Seventeen Coils
Seventeen Coils

This instrument has seventeen small coil springs anchored to small brackets at one end and attached perpendicularly to a soundboard at the other. They’re plucked longitudinally with fingernails. The soundboard is a sheet of Styrofoam. Although the springs are small, the tones are in the bass range because the springs are lightweight (not stiff). The lightness of the springs makes the lightweight Styrofoam an appropriate soundboard material for the springs to couple to. The instrument sounds reasonably well acoustically, but there are also two piezo pickups on the styro board. The amplified sound is fuller than the acoustic sound because the board is not big enough to project the low frequencies out into the air very effectively, while the piezos pick up the full spectrum and send it to the amplifier. You can tune the springs by pulling them tighter at their mounting brackets (which reduces the active coil count and raises the pitch).
Details: 17 springs tuned diatonically over 2+ octaves from C1 to E3. Spring lengths about 6” to 2”. Two spring sizes used: wire diameter .018”; coil outer diameter 1/4”, and wire diameter .023”; coil outer diameter 5/16”. The Styrofoam board is 12” x 16” x 1/4”. The two clamp-on piezo pickups can be positioned as desired on the board. The tone is nicer if the highs are attenuated, and for this purpose the pickups are provided with an onboard preamp with tone controls.
In the following audio clip, Seventeen Coils is joined by Airy Air and miscellaneous percussion.
Silver and Black
Silver and Black
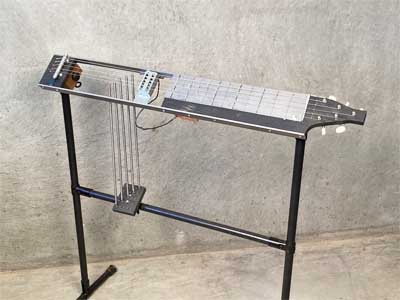
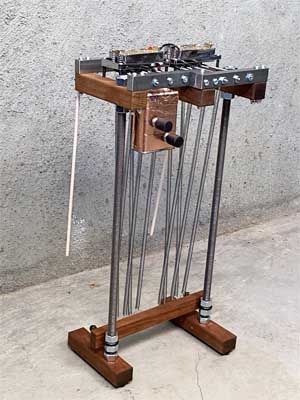
In this instrument the primary vibrators are strings. Long, lightweight coil springs are attached directly to the strings to add springy reverberation to the sound. The five strings run over a fingerboard and the instrument has a stand so it can be played by fretting and plucking in table-top guitar position. There’s no soundboard; the instrument uses a guitar-style pickup under the strings. The instrument and its stand are designed so that the springs can run directly downward from the strings, attaching to a crossbar lower on the stand. The angle of the springs relative to the orientation of pickup makes a big difference in the sound. The sweetest tones can be found with pickup and springs at an angle relative to one another. For this reason, the mounting is made so that the instrument can be pivoted to a suitable angle even as the springs remain vertical. The fingerboard is a smooth steel sheet and the frets are tiny bar magnets. These can be moved to different locations for different tunings. The spring-resonated tone has a tremolo resulting from the periodic slap-back of reflected longitudinal waves in the springs. You might wonder, does the presence of the springs alter the pitch of the strings or affect their ability to vibrate? The answer is that the strings are heavy enough, and the springs light and yielding enough, that the strings vibrate well and retain their pitch even as the springs color the tone.
Details: Five strings tuned like the lower five strings of a guitar and similar in length. At the upper end the springs hook over the strings, staying in place by virtue of their own slight pull. The point along the strings at which the springs hook over can be varied; best sound depends in part on the weight and tension of the string, but typical would be a point about 1/5 of string length from the bridge. The position of the crossbar below where the springs are attached is adjustable; typical positioning makes the springs about 18” long. Spring wire diameter .018”; coil outer diameter ¼”.
Only Ten
OnlyTen
 Like the Silver and Black just described, in Only Ten the springs serve to add reverberation to separate initial sounding elements. In this case, those elements are lamellaphone tines in the form of a set of ten threaded rods tuned by length and sounded by striking with small mallets. As with Silver and Black, the springs hook over the tines and are attach to a cross piece below. Magnetic pickups are positioned under the tines to hear their spring-resonated sounds. The threaded rods have weights added near the ends for overtone tuning. The overtones in these rods are normally inharmonic, but the weights are positioned to put the most prominent of the overtones three octave above the fundamental. The springs have a way of bringing out and sustaining this overtone, making the overtone tuning particularly important for this instrument.
Details: Ten tines tuned over a range from A2-E4, made of 6-32 threaded rods ranging in length from 4.5” to 2.25”, played with small aluminum-headed mallets. Spring length 16”; wire size .018”; coil outer diameter 1/4”.
In the following audio clip, Only Ten is joined by Airy Air and a rainstick.
Sad Aggies
Tall Sad Aggie
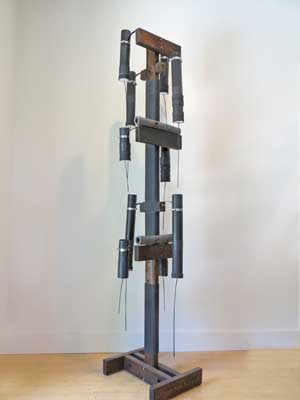
This is a development of the commercially available drum-and-spring devices called Thunder Drums, discussed earlier. The Sad Aggies are tuned sets of such spring drums. The spring produces a broad-spectrum sound, but in the tubular versions of the Thunder Drum one pitch clearly stands out in the final sound, which turns out to be not from the spring, but from the air resonance frequency of the tube. A close listen also reveals another distinct frequency in the spring itself, almost buried in the broad-spectrum sound. In the Sad Aggies, the drum-like air resonance tubes are tuned to the intended pitches by adjusting the tube length, and the springs suspended below from the membrane are cut to lengths such that that one recognizable spring frequency is an octave below the air resonance pitch. They can be played by shaking the drum or striking the spring with a sort of foam bat. I’ve made a hand-held set, suitable for hocketing, and another set mounted on a stand with the spring drums held on flexible spring steel bands for either striking or shaking.
Details (for the mounted set): Ten Sad Aggie spring drums. Drum tubes 2” ID, lengths from about 8” to 18”. Springs coil outer diameter 3/16”, wire diameter .032, lengths ranging from about 7.5” to 16”. Range diatonic from E3 to G4.
In the following audio clip, Tall Sad Aggie is joined by Spaghetti and 2+2+1.
Both Modes
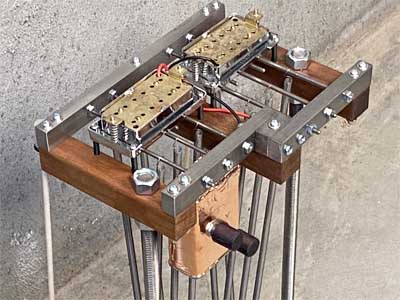
Both Modes
Admittedly, this isn’t a terribly successful instrument, but still perhaps worth describing. It has three springs 20” long, different gauges and diameters. They run parallel over a board which can serve as a fingerboard. There are two magnetic pickups, and this is the most important idea about this instrument: one pickup is positioned under the springs to pickup transverse modes; the other is positioned at the ends of the springs to pick up longitudinal modes. At the end with the longitudinal pickup, the springs are attached to a post of sufficient rigidity to give the springs a good end-anchor, but still flexible enough to move a bit in response to the spring vibrations and contribute to the signal in the end-pickup. Along with the pickups’ volume control there is a blend pot which allows you to select one pickup or the other or a mix of both.
For transverse playing, you can pluck the springs like strings — two of the three springs are well suited to this — while fretting along the fingerboard. Even though the springs are not very long, they produce an unusual but very nice pizzicato bass sound. The longitudinal sounds, unfortunately, don’t seem terribly effective or interesting, but they do add some variety to the available sounds.
But then, after I had pronounced my disappointment in the completed instrument, a friend came along and started wailing on it, doing some very groovy stuff … so I guess you never know.
Details: Three springs, 20” long (but fingerable to shorter lengths). Wire diameters and outer coil diameters: .026” x 1/8; .031” x 3/16”; .049 x 3/8”. Range for the transverse “string bass” function: about C1-C3.
In the following audio clip, you can hear Both Modes playing a bass line in transverse mode and springy sounds in longitudinal mode.
Nameless Long Spring Thing
Nameless Long Spring Thing

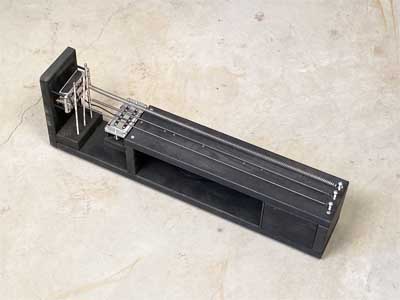
None of the instruments described above go all in for pure sproingy spring sounds, so I put together this instrument with that in mind. It is not much more than a four-foot 2×4 with a pair of long, lightweight coil springs lightly stretched over its length. The springs are attached at one end to a large Styrofoam drinking cup. The cup alone does a decent job of amplifying the spring sounds except that it is a bit weak on the low end. A clip-on piezo attached to the cup remedies this. This set-up primarily brings out the longitudinal vibrations in the springs. This instrument is good for Zube-tube-like space-laser sounds, and has nice, slow slap-back effects. You can pluck longitudinally or play around with transverse plucks and percussion. The transverse techniques tend to make the springs slap against the board, and the resulting excitation creates longitudinal goings-on as well. You can do something akin to fretting, shortening the springs’ vibrating lengths by pressing down between the coils with a ruler-shaped piece of metal in knife-like fashion. When the remaining active spring length is long this has surprisingly little effect on tone aside from speeding up the slap-back frequency, but for shorter lengths it does alter the tone and pitch sense.
Details: Two springs, 48” long. Wire diameters and outer coil diameters: .018” x 1/4; .031” x 5/16”.
APPENDIX 1: More about Modes of Vibration and Acoustics in Coil Springs
The following notes delve a bit deeper into certain aspects coil spring acoustic behaviors.
Are the overtones in the sounds of coil spring harmonic? Indeed, the vibratory modes for coil springs in some configurations under ideal conditions can be expected to be harmonic. They would thus produce overtones forming a harmonic series, as with musical strings and many winds. In fact, in springs with the right sort of scaling and mounting, if the fundamental and lower overtones are comfortably within the hearing range, one can sometimes hear harmonic overtones. On the other hand, I suspect that there are a lot of not-so-theoretically-ideal things going on in most of spring vibrations, having to do with the inherent stiffness of the springs. In many such cases you might hear what may be detuned harmonics. In other cases the sounds may just seem to devolve into some kind of scarcely interpretable mash-up of modes and frequencies – especially since, as noted above, the fundamentals that might otherwise help define the pitch are often subsonic.
Can you predictably vary the pitch in a spring by shortening the effective vibrating length, as with strings? Let’s look first at springs in transverse vibration. Patterns of transverse vibration in long, soft coil springs, as mentioned earlier, are closely analogous to those of transversely vibrating strings. If you make the active part of the spring longer or shorter (as in fretting, for instance), the effects on fundamental pitch are mostly similar to what they would be in strings. Same goes when you put the spring under more or less tension. If the fundamental pitch is in the hearing range, you can configure and play such a spring much as you would a string: It can be plucked or hammered, tuned by adjusting length or tension, and fingered to vary the pitch. We also know that with stretched strings, if they are to be harmonic, we need to keep the stiffness of the string material more or less negligible; stiff strings produce inharmonic overtones. The same is true with long coil springs: if the spring is very supple, the overtones may be pretty close to harmonic, but when the spring is stiffer then the overtone behavior will be more unpredictable. Similarly, very supple springs can be expected to approximate the pitch relationships of strings when “fretted,” but experience suggests that the pitch-length relationships are skewed if the spring is stiff. And once again it’s important to add that if the fundamental is subsonic, as it often is with long springs, then the audible sound will likely be in a territory of unruly upper partials; comparisons to familiar string instruments then become less relevant.
Another form that transverse vibration can take: With relatively stiff, short springs you have the option of rigidly mounting at one end. Plucked sideways, such a spring would vibrate in a manner analogous to a lamellaphone tine (e.g., kalimba). Such prong-like configurations are normally inharmonic in any case, and when you add in all the peculiarities of the spring form, not to mention that fact that the fundamental is likely to be subsonic, then the audible overtones become less predictable.
Moving on now to the patterns of longitudinal vibration in long, soft coil springs: As mentioned earlier, the longitudinal spring modes are analogous to those of the longitudinally vibrating air columns in some wind instruments, but there are some special circumstances to note in the case of springs. We can start by asking, are the frequency and length relationships in longitudinally vibrating strings comparable to those in tubular wind instruments? Indeed, as you’d expect, the longer the spring is, the lower its fundamental tone. But for coil springs we need to redefine length not as the distance between end points as measured with a ruler; instead we can think of a property that can be represented as coil-count: how many turns of the coil of spring are in play? For a given spring, the same number of coils between the end points will yield roughly the same pitch whether lightly stretched (end points closer together) or strongly stretched (end points farther apart). Bringing more coils into this active length will yield a lower pitch. This relationship holds, at least approximately, if tensions remain modest; with extreme stretching it becomes less consistent. In keeping with this, a long, soft, longitudinally vibrating spring is amenable to something like fretting to vary the pitch, although things get a little weird when the active length is very short. Once again, of course, all of these considerations become less meaningful in cases where the fundamental is subsonic and the audible tone is a mess of overlapping partials.
Appendix 2: More Notes on Bowing
The following paragraphs are from “The Springboard: The Joy of Piezo Disk Pickups for Amplified Coil Springs” by Eric Leonardson in Leonardo Music Journal Vol 17 2007 https://www.researchgate.net/publication/240678051_The_Springboard_The_Joy_of_Piezo_Disk_Pickups_for_Amplified_Coil_Springs
Bowing is my preferred approach to coil springs over percussive techniques because it excites and sustains sounds over a longer time with richer harmonic content. Bowing at any angle other than transverse avoids jamming the bow between the coils. More rosin and pressure than one normally uses on a cello string works best.
With practice, one can vary the inharmonic tones produced by bowed coil springs with changes in bow pressure and direction, along with manual muting and manipulation of the spring. The tones can range from an agglomeration of pitches to an indefinitely pitched drone, often with a large amount of low-frequency content. With [more than one spring on an instrument], it is not difficult to use two bows at once, one in each hand. Bowing close to the supports as with a sul ponticello (near the bridge) technique brings out the higher partials, enabling bittersweet melodic passages to be made, while a sweep of the bow across the span of the spring shifts the pitch down to the lower fundamental(s). Modulating the bow pressure during a bow stroke varies the frequency response. When one hand is free while the other bows, the spring can be held in various ways to dampen it and emphasize more definite pitches.