I recently spent some time in the shop doing a new round of experimenting with wind instruments of the family that I call ‘Moe. I described the resulting developments in ’Moe design in this recently uploaded article. Some of that shop time was spent on things that are not specific only to ‘Moe, but are of general interest in the area of homemade wind instrument making. The current article is a hodge-podge of notes on those more widely applicable topics. We’ll touch on register holes, fabrication of single reed mouthpieces, making barrel joints to accommodate store-bought mouthpieces, and minimally toxic plastics for making homemade wind instrument tubes.
An Easy Way to Make Barrel Joints to Connect Mouth pieces to Tubes.
The original ‘Moes were made to work with standard, store-bought woodwind mouthpieces. I have made several ‘Moes that use Bb clarinet mouthpieces, as well as others using alto clarinet, tenor sax, and tenor recorder mouthpieces. One challenge in working with preexisting standard mouthpieces has been making sure that the mouthpiece fits the end of the ‘Moe instrument just as snugly and leaklessly as it would fit a store-bought instrument body. Another concern is making sure that that the inner diameter of the tube that meets the mouthpiece is sized so that there isn’t a sudden change in bore diameter at the meeting point. For the most part I have dealt with these issues as you might expect, by choosing tubings with inner diameter quite close to the inner diameter of the instrument whose mouthpiece I was borrowing, and very carefully sizing the pieces into which or onto which the mouthpiece fit. In practice this is easier said than done. However, I did eventually come up with an easy home-made way to make the equivalent of a clarinet barrel with an excellent fit on both sides. (The barrel is the short piece in the classical clarinet that connects the mouthpiece to the rest of the instrument.)
This trick, quite doable for home builders, is to make the barrel out of a low-temperature thermaplastic. This moldable plastic comes in the form of a bag full of little beads. You melt the beads by dropping them in hot water, and then you can mold the resulting glop by hand into whatever form you want. I was able to create the well-fitting barrel for a clarinet mouthpiece by first greasing the relevant part of the mouthpiece (I used lithium grease), then positioning the mouthpiece and tube together end-to-end, striving for perfect alignment, then molding the warm plastic over them and letting it cool. For this it’s good to use a mouthpiece with a well worn cork, to ensure that a mouthpiece with a new cork will fit quite snugly. For what it’s worth, the label on the thermaplastic, says that the stuff is benign and non-toxic. In any case, you’re not putting this barrel section in your mouth as you would the mouthpiece itself, making any potential toxicity of the barrel less of an issue. The thermaplastic beads are easily available and not overly expensive. This moldable plastic is actually pretty cool stuff, potentially useful in a many applications, if you’re not too put off by the thought of adding more plastics to a world already overburdened with them.
Fabricating Your Own Mouthpiece
Another alternative: Instead of using a standard, store-bought mouthpiece, there’s the option of fabricating your own mouthpiece. One very nice approach, if you’re going to do this, is to make the mouthpiece as part of the instrument as a whole. Rather than making a separate mouthpiece, you shape the end of the instrument tube into the required mouthpiece form. This is routinely done with simple flutes. It’s done less often for reed instruments, which normally have separate mouthpieces — but note that bamboo saxes are usually done this way, so it’s far from unheard-of. I was mostly concerned with single reed mouthpieces à la clarinet or saxophone, so I’ll focus here on the shaping of the single reed mouthpiece.
You might be surprised at what an effective mouthpiece you can make just by cutting the end of the tube at an angle mimicking that of a clarinet or sax mouthpiece and carefully shaping the resulting surface over which the is to reed lie; then strapping a clarinet or sax reed on there with a rubber band. The surface over which the reed lies is called the lay, and the whole trick is giving this surface just the right degree of curvature. You can study a standard clarinet or sax mouthpiece to get a sense of how this very slight curvature should go. Notice how, when the reed is in place, the lay curves slightly away from the reed toward the tip. Sanding this surface into just the right shape calls for a nice touch and a high degree of control. But if you have access to a bench sander (a fairly common and not killingly expensive tool), there’s a relatively easy and dependable way to achieve the required degree of refinement in the process. This approach works for wooden or plastic tubular instrument bodies. Typically the bench sander includes both a belt and disk sander. The disk, which is mounted vertically, has a very small attached table in front of it to rest the work on. For the lay-shaping job, remove this table and replace it with a much larger table, large enough that most of your wind instrument tube can rest on it. Of course you wouldn’t attach this large table to the sander; just make it the right height so that you can place in on the bench top in front of the sander. The idea is that, having made an initial rough-cut to create the mouthpiece angle at the end of the instrument body, you can rest the instrument body on this table, and in a very controlled fashion feed it into the disk sander to shape the lay surface. In doing this you need to prevent the instrument body from rolling or tipping sideways as you carefully press it against the sander disk. For this, try to find some kind of clamp — a spring clamp or a small C-clamp may work– that you can clamp somewhere toward the far end of the instrument body so that when it rests on the table the clamp prevents the body from rolling or tipping. Be sure that the clamp is positioned so that the angle cut is perfectly vertical, parallel to the vertical surface of the sanding disk. Now you can shape your lay in imitation of a standard mouthpiece by gently and carefully pressing it against the sanding disk. Don’t be afraid to do a bit of experimenting, first shaping, then strapping a reed on for testing, then removing and shaping again until you get something that speaks easily and sounds good. (What? You’re not already an experienced reed player? Then get someone who is to help with the testing.)
Important note for this method: Clarinet reeds are rather narrow, and for a tube whose inner diameter matches that of a clarinet, the standard clarinet reed will be a tiny bit too narrow to dependably fully cover the opening created when you make the angle cut for the lay. Store-bought clarinet mouthpieces are made to accommodate the narrow reed, but this involves more complex shaping of the mouthpiece. Saxophone reeds are wider, and will serve where a clarinet reed will not. You can use an alto sax reed to cover a clarinet-sized bore, or you can play it safe and go still wider with a tenor sax reed. The differences in tone quality or playability between these reed types are, to my ear, not problematic. I have also come up with methods for making the mouthpiece opening narrower to accommodate the narrower clarinet reed, but they’re more complex to make, and in any case they don‘t necessarily produce a better result, so I won’t describe their construction here.
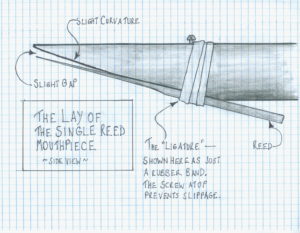 On clarinets and saxes the metal band used to strap the reed in securely place is called the ligature. A ligature borrowed from one of these instruments will not work well with the system for mouthpiece making system just described. Instead, as mentioned above, you can simply use a rubber band, or devise some other reed-strapping system of your own if you want something more elegant. To improve the way the rubber band holds in place, add a small post in the form of a tiny screw sticking up from the opposite side of the instrument body opposite the lay as shown in the drawing.
(Aside from clarinet- and sax-style mouthpieces described here, you can also have fun with a home-buildable single reed form that is closer to those found in an organ reedpipe, with reed in the form of a strip of flexible metal positioned over a hole drilled near the end of a stopped pipe. You can read about that in this article.)
Register Holes
With reed instruments, as with flutes, you often can extend the range of the instrument upward by the use of register holes. With flute-like instruments such as recorders, this may be done by half-covering the highest of the tone holes, leaving it open just enough to cause a small leak there. With reed instruments it’s more often done by means of one or more separate small holes for the purpose. Register holes are very small holes which, when open, cause a wind instrument to sound in the upper register rather than the fundamental register. This extends the range of the instrument beyond what the fundamental register alone would allow. The hole does this by creating a small leak in the tube at a point that sabotages the air column’s vibration pattern for the fundamental mode, but not that of next higher mode of vibration, thus allowing the upper mode to dominate the sound. In clarinets, the ideal place for this leak is at around 1/3 of the effective tube length for the sounding note. Open the small leak at that point, and the perceived tone will tend to jump to the next register note a twelfth above. (For flute-like instruments and sax-like instruments, the crucial spot is about 1/2 of the effective tube length, and the pitch jumps to the octave.)
But this “1/3 of the tube length” business is not a clear cut as I’ve made it sound. There are complications buried in my use of the phrase “effective tube length”. Most important is the fact that the effective length changes with each new note, as the player opens more tone holes or uncovers more of the slit. Nor is it as simple as saying that the effective tube length equals the distance from the start of the mouthpiece to the first point at which there’s an opening in the tube. The effective tube length generally extends somewhat beyond that, but how much beyond depends on various factors including bore diameter, hole size or slit width, and the frequency of the note. Two things follow from this: 1) it would appear that you’d need a differently located register hole for each note, and 2) the ideal location for that hole would be a messy thing to calculate. But the rule of sloppiness saves us here. While the 1/3 location is ideal, it turns out in practice that a register hole that is imperfectly located, even one that is fairly far away from its ideal location, can still work, especially with help from a skilled player with good embouchure control. So your reasoning in deciding where to locate a register hole on a clarinet-like instrument might go something like this: First consider the effective tube length for some note near the middle of the range over which you’d like the register hole to be effective. That length will be the distance from the reed to the first opening in the tube, plus a little more to allow for the fact that the effective length will be a bit longer than the physical length of the enclosed portion of the tube. (I’m describing this very crudely, I know.) You can then figure on placing the hole at about 1/3 of this length, in the hope that this central location will work well enough across the hoped-for range.
Implicit in all this is the question, how badly misplaced can a register hole be and still be effective? This determines how much range you can get in the upper register with a single register hole. Professionally made instruments can do quite well on this question, covering a large range with a single register hole. But that involves getting a lot of factors just right, including hole size and hole height as well as location. On the other hand, you can make the upper register secure over a larger range by having more than one register hole. In my work with the type of ‘Moe design I call Floppy ‘Moe (see the other article for a description), I was able to have two register holes nicely positioned for convenient and facile playing. With those two register holes was able to extend the range easily an octave and more into the second register.
Register holes should be small, typically in the range of 7/64”. (Remember, all we want is a small leak.) For acoustic reasons unknown to me, the register hole on a classical clarinet is made extra tall, being extended by a tiny pipe extending a about 5/16”into the tube. But you can make simple and successful register holes without this extension, just by drilling the small hole in the tube wall. And here’s something very convenient about these holes: being so small, it’s easy to backfill them with a bit of silicon or similar gloppy glue, or even just to temporarily cover them over with with sticky tape. This means that with an experimental instrument (as opposed to one that must look perfectly finished when completed), you can experiment to find the best register hole locations by drilling, testing, backfilling and re-drilling as many times as needed.
Suitable Plastics
I have mentioned the possibility of making the ‘Moe body out of plastic, which has a lot of advantages. But what kind of plastic? The chosen material should have the following properties: it needs to be hard enough at least to be rigid; machinable without shattering; non-toxic; and available and affordable as tubing in the desired diameters. The non-toxic part is especially important for instruments in which the mouthpiece is of-a-piece with the main tube because for these the tube-end goes directly in the mouth; it’s less crucial for those which will use a separate commercial mouthpiece. Contemporary student model clarinets, including a lot of excellent instruments, are usually made of a material commonly referred to as “hard rubber,” also called ebonite or vulcanized rubber. This material doesn’t seem to be readily available and affordable in tubular forms — at least, I have been unable to find it — so the do-it-yourselfer experimenter will probably need to consider other possibilities.
Lots of casual homemade wind makers have worked with PVC tubing because of its easy availability and affordability. To this we can add the convenient fact that the interior diameter of the widely available nominal 1/2” PVC conduit, at just under 5/8”, is remarkably close to the classical Bb clarinet bore diameter. And the wall thickness is suitable for making many sorts of winds (including ’Moes, where wall thickness is important in providing a suitably wide gluing surface where the metal bar is to be attached). Also, PVC is easily workable with common tools (but be sure to wear a breathing mask!). We won’t worry too much here about the fact that PVC is ugly.
The question of toxicity is a concern, though. Exposure to PVC is more routine than you may think; for instance, lots of people get their water through PVC pipes. If you’re the sort of person who doesn’t worry too much about such things, you may be happy to work with PVC. And of course the worry is much less if you’re working with instruments using a separate standard mouthpiece, meaning that there will be no oral contact with the PVC. Still, for many of people the toxicity issue is a deal-breaker.
So what are the other options? It can be difficult to sort through information on the toxicity of plastics, because when you search on such questions online, the results tend to skew toward either industrial sources saying everything’s fine, or crusaders for whom all plastics are evil. Nonetheless, there are sources ranking different plastics for safeness. Frustratingly, it often turns out that the rigid plastics that score best in terms of toxicity ratings or not generally available in tubular forms at suitable diameters and wall thicknesses. However, I eventually did find a plastic that seemed to fit the bill pretty well: excellent rating for non-toxicity, excellent machinability, and available as tubing in suitable sizes. That plastic is Acetal Delrin, AKA Polyoxymethylene or POM, available here: https://www.mcmaster.com/acetal-tubing (and probably other places as well). It’s costly — quite a bit more than the amazingly inexpensive PVC tubing, for instance — but not insanely so. I’ve now made a couple of ‘Moes of this material. Yet I don’t regard this as the final word on plastics for homemade wind instrument making; if you have other suggestions please share.