A while back I received an email with a suggestion: Why not create a commercial collection of audio samples featuring prepared piano sounds, using my old upright? The suggestion came from Mike Peaslee, the head of Soundiron, a company that produces and sells sample libraries. For the last few years I’ve been recording sample libraries for Soundiron presenting one-of-a-kind instruments. (You can see many of my instruments in the instrumentarium of my website. You can check out my other Soundiron sample libraries here, and I’ve written previously about my work for Soundiron here and here).
But regarding Mike’s idea for a prepared piano collection, I was doubtful. There are people who really know the world of prepared piano as developed by John Cage and followers; if Soundiron were to produce such a collection, surely they should work not with me but with someone more knowledgeable. I even had suggestions for a good candidate or two. Mike responded that the proposed collection would not be presented as a part of the Cagean prepared piano tradition, but rather as part of my own idiosyncratic collection of sound explorations, featuring whatever quirky non-Cagean ideas I might have about how to weird-out an existing piano. This would fit with the collections we had been releasing thus far as part of Soundiron’s Hopkin Instrumentarium series. I still had some hesitation, but he was persuasive and the project did sound like fun, so in the end I agreed.
As for the idea that the project should be done on my old upright, there were both pros and cons. Prepared piano work in the tradition of John Cage is normally done with grands. In addition to their matchless sound, grand pianos have the advantage (for purposes of preparation) that their strings are more exposed and accessible, and the horizontal orientation means that many preparations can be put and kept in place easily. With uprights, traditional preparations are often awkward and sometimes impossible to install. Other preparations are feasible only over a limited range because many strings are partially or wholly inaccessible behind banks of other strings or behind the action. On the other hand, there’s also something appealing about the idea of using an every-day, non-fancy instrument — and, by the way, I am quite fond of my old upright; it has a nice, bright sound through most of its range (though, like most uprights, it’s pretty hopeless at the extremes). It also has a pleasing history of the “all those years in Great-Aunt Gertrude’s parlor” variety.
This, then, was my challenge: to come up with a set of unique and interesting new preparations for my old upright. I quickly realized that doing preparations for sampling is different from doing them for performance. For performance, it’s typical to make each note unique – do something interesting to for this note, do something else interesting for that one. But in recording samples, once you’ve found a good sound, it makes sense to apply it across a larger range of strings. You can record a given preparation over some range, then remove that preparation and set up to record the next preparation across the range. This idea of “set up, then remove and set up something new” is not feasible in performance, but for sample recording it is and it can work to make a variety of cool sounds available across a wide range. This suggests the possibility of a different sort of playing: where in traditional prepared piano for performance it’s typical to have a generous menu of quirky one-notes, with sampling one might instead choose to see each preparation, extended across the range, more like a ‘voice” or an organ stop.
With sampling it is also much more feasible to modulate sounds in real time. For example, you can strike a note with one hand, while with the other varying the position of a damper or rattle to modulate the tone as it sustains. In addition, you can try larger and more inconvenient modifications to the instrument. This might involve adding big or clumsy contrivances to make some modification to the tone possible. In some cases it might involve temporarily removing the entire action to provide better access for some alternative methods for sounding the strings. In coming up with preparations to go into the Soundiron collection, I leaned into these sorts of things – approaches which might not be practical in live performance, but which were feasible for samples recording.
Here are some of the preparations I explored.
- Sounding the strings with a hand-held audio driver.
Think of a speaker driver – the component at the center of a loudspeaker which takes the audio signal from some source and transduces it into the physical vibration that drives the speaker cone. You can purchase a gadget that functions much like this but is designed to drive not a bespoke speaker cone, but some other surface of your choosing – a wall or window for instance. That larger surface then serves the purpose of the speaker cone, providing a lot of surface area to pushing a lot of air to get the sound out into the room. These all-purpose drivers are meant to be mounted semi-permanently on the wall or window, but they can also be hand-held – pressed against some likely sound-radiating surface. So what will happen if you hold one of these against a piano string? The answer depends on what kind of program is being fed to the driver. For this piano preparation, I simply had the driver produce the frequency of the string it was to be pressed against. This was easy to do using a Casio-style electronic keyboard: Press the key for the note C#3 (for example) on the keyboard; send the output to a power amp and from there to the hand-held driver; press the driver against the C#3 strings (with dampers lifted) on the piano. No surprise: the strings respond impressively to being driven at their preferred frequency. The tone quality depends a lot on the point and angle of contact between the driver and the strings, and you can create striking timbral shifts by modulating pressure and angle. This preparation is doable on a normal upright over much of the range. (In the higher ranges, the piano action increasingly blocks access to the strings. You can do the highest strings if you temporarily remove the action.)
- Sounding the strings by friction against a monofilament line tied to the strings.
For this preparation, start by tying a piece of very thin fishing line, about three feet long, around the strings for a chosen note, positioning the knotted loop around the strings somewhere not far from the upper bridge. You’ll be using finger friction here, so you’ll need a generous amount of rosin on your fingers; one way to do this is to coat your fingertips with something like the powdered rosin that baseball pitchers use. Pinch the monofilament between thumb and forefinger and pull away from the piano with a moderate pressure that allows the string to slip through your fingers with enough resistance for good friction. When you get it right, the piano strings will sing clear and loud. The sound is somewhat reminiscent of a bowed string sound, yet quite distinctive: in the lower and mid ranges it’s like arco bass or cello but with an exaggerated immediacy and presence, while near the top it approaches an eerie whistling. Most of the strings can be treated this way with the action in place, but for the very highest strings, once again, it helps to remove the action. This finger-friction idea is similar to what we see in this instrument from my instrumentarium, but when applied to the massive sound-generating body that is the piano the results are really impressive.
(More about the rosin: as an alternative to baseball rosin bags, you can create a suitable rosin powder by hammering a block of violin bow rosin, or less expensively by hammering the aromatic incense called copal.)
- Selective damping to bring out certain harmonics.
Many traditional piano preparations involve added damping: wedging pieces of sponge or the like under or between the strings to create a sound that’s weak in the high harmonics and decays rapidly. In a more sophisticated application of this idea, you can position the dampers in a deliberate way to minimize some harmonics while allowing selected others to ring, creating unusual and distinctive tone qualities. This is mostly a matter of where you choose to place the damper. A damper placed quite close to the bridge will tend, broadly speaking, to damp all overtones to a greater or lesser degree, with higher harmonics generally damped more than lower. Placing a damper farther from the bridge will tend to damp certain harmonics much more than others, and by deliberate placement you can, within limits, select which harmonics will be allowed to ring and which will be damped. The rule is: harmonics which have a node at the damper position will minimally damped, while those harmonics for which the damper is located far from any nodes will be more damped. You could, if you chose, diagram the string motion to show node locations for the different harmonics, and then select damper locations designed to favor certain selected harmonics. Alternatively, you can simply try placing a damper at different locations along the strings for a given note, making note of those locations that produce the most interesting tone qualities. Having found an interesting location for one note, it’s not difficult to add a damper at the corresponding location on an adjacent note, and continue from there to place dampers for this particular tone quality across a larger range. For the Soundiron collection, I chose two such damper locations, producing two very different tone qualities, and recorded samples for each across as much range as I was able given the accessibility of the strings. Although I had some idea which overtones I was selecting for by my choice of damper locations, my choices were dictated more by my ear than by theoretical analysis.
By the way, you can have fun doing something like this with any string instrument. The process is most predictable and rational with strings of fixed lengths – that is, instruments like harps and zithers that don’t use frets or slides to alter active string lengths during playing. With fretted instruments, node locations shift each time you press behind a different fret, complicating the question of damper position. Yet even with guitars and other fretted instruments it’s still possible to have fun with this idea, in part because there’s some play and flexibility built into the situation. I discussed this in my book on guitar preparations (no longer in print) and you can hear examples of this and other guitar preparations here. (The harmonic damping preparation is track 3 on that page.)
- Bowing a lightweight, tuned secondary string attached to the main strings.
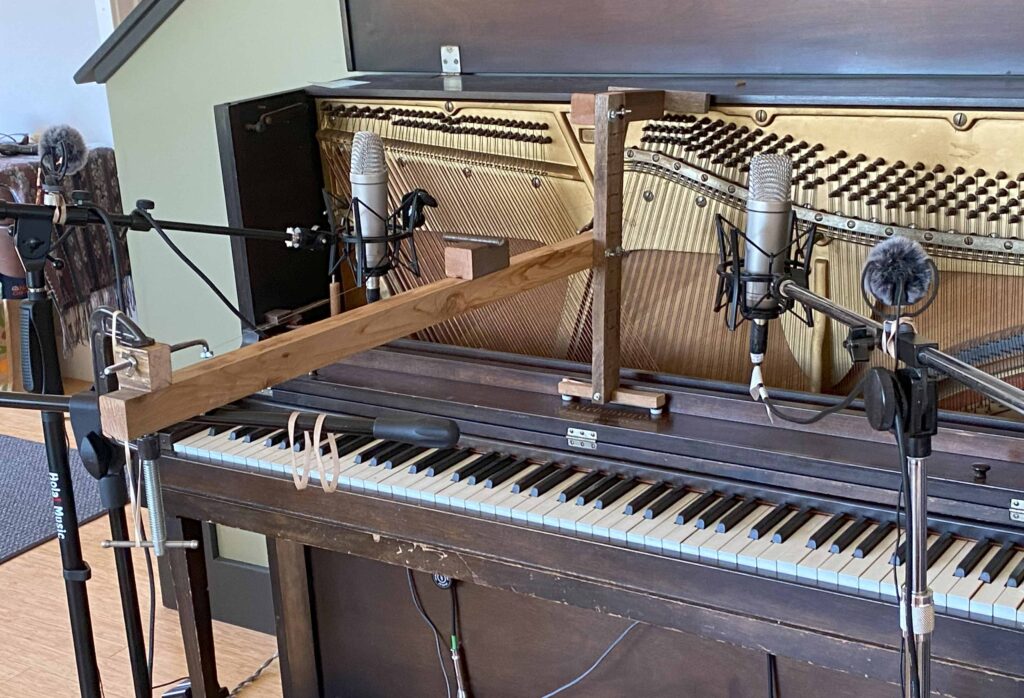
When it comes to contraptions attached to the piano, this is the wackiest of the preparations I did. The underlying concept isn’t so wacky though. The idea is to create a bowed piano effect by attaching a lightweight secondary string directly to the piano’s own strings and to bow the secondary string. For this to work, it makes a difference what note the secondary string is tuned to. The piano strings will not respond much to some random unrelated frequency. They will respond nicely, though, if the secondary string is tuned to the same fundamental pitch as the relevant piano strings. For the set-up, this requires some way to anchor the end of the secondary string away from the piano, and it must be done in a way that makes the secondary string tunable. A picture of my set-up appears on the right. It involves a crude wooden brace placed against the body of the piano with the tunable attachment for the string at the far end of the brace; it also accommodates a movable bridge. You can tie the secondary string to the piano strings with a small, loose loop, and for best effect the point of attachment should be fairly near to the piano bridge. The rig I set up held one secondary string. I had to I laboriously move the brace and secondary string from note to note as I sampled one note and after another. For each note I bowed the secondary string near one end or the other. Finding room for the bowing motion, given the physical set-up, was often awkward and wasn’t possible for the highest and lowest notes, even with the action removed. With the secondary string tuned to the same fundamental frequency as the main strings it was attached to, the technique worked well over much of the range, with the vibration of the bowed secondary string exciting the main strings quite effectively to produce a warm and full bowed piano sound. The tone was enriched by any imperfection in the tuning: with the secondary string was just slightly out of tune from the piano strings (as it typically was, given the crudeness of the tuning mechanism), a chorusing and beating came into play between the two to create a pleasing complexity and richness. This preparation worked best in the lower and mid ranges; with higher notes the process was undependable and the tone not so great.
- Active damping and undamping.
Here’s another thing that is more feasible in the recording of samples than it is in live performance: anything involving active modulation of tone quality as the note sustains. If your hands are busy on the keyboard, it’s hard to at the same time have hands on the strings modulating the tone in one way or another. We saw an example of this sort of active tone-altering in the first preparation discussed above, the use of the hand-held driver against the strings: by slightly shifting the angle or pressure or position of the driver against the strings, you can create shifting in tone qualities as the notes sounds. Another active-modulation technique – this one really quite simple and straightforward – is the use of a hand-held damper. With one hand, sound the strings from the keyboard; with the other press and/or unpress a piece of sponge rubber against the strings in a way that alters the sustaining tone. Two ways of doing this suggest themselves: 1) Sound the string undamped, so that the full range of harmonics is revealed as usual, then bring the hand-held damper down at some chosen speed and location. The resulting sound – full harmonic tone but unusually rapid decay – is not terribly exotic, but it is an appealing and useful effect. 2) Sound the string with the damper held in place against it, and then quickly lift the damper. This yields a tone in which the higher harmonics are initially suppressed, but after the attack and removal of the damper the sustain is long, and there’s even a sort of blooming effect as some of the harmonics subtly come back into play – a very nice sound.
- Flutter Fanning
This is an extended technique that some guitarists have used, applied here to piano. Start with a very small and inexpensive hand-held fan, one of the sort with blades soft and light enough and motor weak enough that it doesn’t need the protective cage that larger fans have. With the piano’s damper pedal depressed, hold the fan positioned so that the blades strike the piano strings to create a rapid tremolo. This makes an unusual sustaining string sound, and then when you move the fan away from the strings there remains the natural decay of the sound. I found that the blades on the fan that I used were a little too light, producing a rather quiet sound, so I added a touch of weight by putting a staple into each blade near the end. This done, the sound was a bit louder, still fairly quiet, and the dynamic range still rather limited. Even so, it’s a unique and appealing sound.
- Long, lightweight coil springs attached to the piano strings.
This preparation involves attaching a long coil spring to the piano strings and stretching it out perpendicular from the strings at light tension. (The same trick is used in this other instrument from my instrumentarium.) On the upright piano, the spring extends out horizontally. To hold the spring at the far end under light tension, I used the same wooden brace contraption described earlier for the preparation involving tuned secondary strings. The last coil of the spring can be bent so that it hooks easily around the strings at a point a little distance from the bridge. If you press the pedal to lift the dampers and use the keyboard to strike the note, the spring will add a nice reverberation to the tone, including periodic slapbacks as the impulse repeatedly travels the length of the spring, reflects at the far end and returns. The spring I settled on, after some experimentation, was fairly light in gauge, about ½” in diameter and about 30″ long. It makes a big difference in the sound how far from the bridge the spring is attached; this is worth experimenting with. I sampled the effect over a fairly large range by positioning the brace and spring on the strings for one note, doing the sampling for that note, moving the brace and spring to the next note, and proceeding from there.
Those are the preparations I submitted to the engineers at Soundiron, with multiple variations for most of them. At the time of this writing the samples collection has not yet been released; we’ll see if the Soundiron people select only the best or decide to include all in the final product. My hope is that the sounds will strike people as unique and original, not just rehashes of prepared piano ideas that others have already put forth. Having been through this project, my main message is: pianos are amazing sound-making machines, and they’ll produce marvelous sounds even when used not according to the instructions on the package.